
Introduction
Celeris is one of the projects I really loved building. I got a the idea when I registered for a college hackathon, which I later got to know is quite biased, and didn’t look for innovation in the first place. But keeping it aside, I wanted to build something which can be continued even after the hackathon, and not just a one-time project.
Our team consisted of four members, and we had to build something that would be useful to people, and not just a project that would be used for the hackathon. We wanted to innovate.
Read the LinkedIn post here.

In India, even though we have a system for UPI payments, there are still a lot of people who do not have access to the internet to perform a UPI transactions. There are a few solutions which are near to this from the Government of India, but they are either being developed, or not available to everyone due to lack of appropriate hardware in phones. We wanted to build a completely offline payments ecosystem that would allow people to make payments without the need for an internet connection. This is how the idea of Celeris was born.
This post is really long, and I will try to cover everything that I did in the project, from the design and architecture of the system, to the implementation of the different components. I will also try to cover the challenges that I faced while building the system, and how I overcame them. I will also try to cover the future plans for the project, and how it can be extended to include more features and functionalities. Be patient, and read through the whole post, as it will be worth it. I will also try to include a lot of code snippets, so that you can understand how the system works, and how you can build something similar. There is a lot to learn!
Table of Contents
- Introduction
- The Problem
- The Solution
- Design Principles
- Architecture
- Celeris SMS Gateway: The Core Component
- Celeris Backend: The Server
- Celeris Database
- Celeris App: The Offline-cum-Online Client Application
- Libraries and Dependencies
- UI Components
- SQLite Database Helpers
- User Model
- MainActivity
- Authentication Flow
- Post Authentication: SecureActivity
- Profile Page
- Scan and Pay Flow
- Send Money Flow
- Success Activity
- Retrofit Client Utility
- AuthApi Utility
- DataUtils: Persistent Key-Value Storage
- QRCodeUtils Utility
- NetworkMonitor Utility
- SMSReceiver
- Un-technical Stuff: Team Coordination and Project Management
- Conclusion
The Problem
The problem we wanted to solve was simple. We wanted to build a completely offline payments ecosystem that would allow people to make payments without the need for an internet connection. The solution had to be simple, easy to use and secure. We wanted to build a system that would allow people to make payments using their phones, without the need for any additional hardware or software.
I searched up a few existing solutions, and we discussed them in our team. Here are the three major solutions that I found along with their limitations from a system design perspective:
- UPI 123 Pay: UPI 123Pay is a service launched by the National Payments Corporation of India (NPCI) that enables users with feature phones (non-smartphones) to perform UPI transactions without internet. It works via IVR (Interactive Voice Response), missed calls, and sound-based technology. While it’s a strong initiative, it suffers from two major issues: limited awareness and a cumbersome user experience.
- Aadhaar Enabled Payment System (AEPS): AEPS is a bank-led model that allows users to carry out financial transactions using their Aadhaar number and biometric authentication (usually a fingerprint). While it plays a critical role in financial inclusion, it relies heavily on physical biometric devices, which are not widely available, especially with small merchants or in rural households. It also poses concerns around privacy and the dependency on third-party infrastructure to function.
- UPI Lite X: This is the nearest solution to ours. It aims to facilitate offline transactions through Near Field Communication (NFC) or device-to-device communication. However, it is currently in early stages of adoption and rollout. Most importantly, it requires specific hardware capabilities like NFC chips and trusted execution environments (TEE), which are still not available on a large number of budget and mid-range smartphones used by the masses. This limits its immediate impact and inclusivity, especially in rural or economically weaker regions.
After going through everything, I saw three main problems from a user’s perspective:
- Limited Awareness: Many people are not aware of the existing solutions, and even if they are, they may not be comfortable using them due to lack of knowledge or experience. This is especially true for older generations who may not be as tech-savvy.
- Cumbersome User Experience: The existing solutions are often not user-friendly, and require a lot of steps to complete a transaction. This can be frustrating for users, and can lead to them abandoning the process altogether.
- Hardware Limitations: Many of the existing solutions require specific hardware capabilities, such as NFC chips or biometric devices, which are not widely available on all smartphones. This limits the accessibility of these solutions, especially in rural or economically weaker regions.
After going through everything, we had to build something that would be user-friendly, even a child could use it. We wanted to build something that would be available to everyone, even if they did not have access to the internet. We wanted to build something that would be available to everyone, even if they did not have access to the latest hardware.
The Solution
Before starting out with the solution and start development in our team, I had to think about the design and architecture of the system so that everyone in the team could understand it, and we could build it in a modular way and how to make it all work together.
The solution was something that needs to be done in a few steps, and would be available to everyone. The only step was to break it down to the most modular level, so that everything can be scaled up on demand. This was the first time I did something like this, so I had to have a lot of patience and a lot of time to think about the design and architecture of the system. I had to think about everything, from the hardware to the software, to the user experience.
To achieve a solution like this, I had to study about the technologies that I would be using in a short period of time and then decide on a very basic working architecture in the beginning, and then build up to a final architecture which could be scaled if needed. This is also because I had to distribute the work among my team members, and I had to make sure that everyone was on the same page. I had to make sure that everyone understood the design principles and the architecture of the system.
Design Principles
The design principles that were followed while building Celeris were:
- Simplicity: The system had to be simple and easy to use. I wanted to build a system that would allow people to make payments using their phones, without the need for any additional hardware or software. Google’s Material Design was a great starting point for the UI/UX design, as it provided a clean and intuitive interface that was easy to navigate.
- Modularity and Scalability: The system had to be modular and scalable. I wanted to build a system that could be easily scaled up or down, depending on the needs of the users. This meant that I had to break down the system into smaller components that could be easily replaced or upgraded. This would also allow for future enhancements and new features to be added without disrupting the existing system.
- Security: The system had to be secure. Although a lot of security features were not implemented in the app for the hackathon, if developed further, the system would have to be secure enough to protect the users’ data and transactions.
Architecture
The architecture of Celeris was designed to be modular and scalable. The system was broken down into smaller components that could be easily replaced or upgraded. The architecture consisted of the following components:
- Celeris App: The Celeris app was the main component of the system. It was designed to be simple and easy to use, with a clean and intuitive interface. The app was initially built using React Native, but then was later migrated to Kotlin for Native Android development. This was done due to major constraint which was the lack of background SMS sending capabilities in React Native, which was a major requirement for the app to work offline. The app was designed to be modular, with different components for different features, such as sending and receiving payments, managing contacts, and viewing transaction history. I will discuss the Celeris app in detail in a later section of this blog post.
- Celeris Server: The Celeris server was the backend component of the system. It was designed to be modular and scalable, with different components for different features, such as managing users, processing transactions, and managing and sending SMS messages. The server was built using FastAPI, a modern web framework for building APIs with Python. FastAPI was chosen for its performance, ease of use, and support for asynchronous programming. The server was designed to be modular, with different components for different features, such as managing users, processing transactions, and sending notifications. Not to mention, FastAPI allowed the whole backend to be built in a very short time, and it was very easy to use. The server was designed to be modular, with different components for different features, such as managing users, processing transactions, and sending notifications.
- Celeris Database: The Celeris database was the data storage component of the system. It was designed to be modular and scalable, with different components for different features, such as storing user data, transaction data, and authentication data. To reduce all the hassle of managing a database and to expose it as a REST API, I used Supabase, an open-source Firebase alternative that provides a Postgres database with a RESTful API. Supabase was chosen for its ease of use, scalability, and support for real-time data updates. The database was designed to be modular, with different tables for different features, such as users, transactions, and balances.
- Celeris SMS Gateway: The Celeris SMS gateway was the component of the system that allowed the app to send and receive SMS messages. This was the core component of the whole system, as it was the middleman which connected the offline app to the online server. I initially thought of using Twilio, but it was not possible to send SMS messages to the phone number provided by Twilio, as they only give a US based phone number, and we needed an Indian phone number to send SMS messages to. So, I decided to build a local SMS gateway myself, which would be available everytime to recieve SMS messages from the users, and send SMS messages to the users based on the requests made by the online server. This was then exposed to the network using a simple REST API, which would have a POST endpoint to send SMS messages, and have a webhook which would send the SMS messages to the server when a new SMS message is received. The SMS gateway was built using NanoHTTPD, a lightweight HTTP server for Java, and was designed to be modular, with different components for different features, such as sending and receiving SMS messages, and managing contacts.
I made a sketch of the architecture of the system on a piece of paper first to actually visualize how the system would look look like, then I had to discuss it with my team members to make sure that everyone understood what was going on, and how the system would work. This was a very important step, as it allowed us to identify any potential issues or bottlenecks in the system before we started building it. I built it on a piece of paper first, then I made it on a whiteboard while discussing it with my team members.
This is the very first sketch of the architecture of Celeris, which was then later refined and built upon to create the final architecture of the system. It was a very simple sketch, but it allowed us to visualize how the system would work, and how the different components would interact with each other.
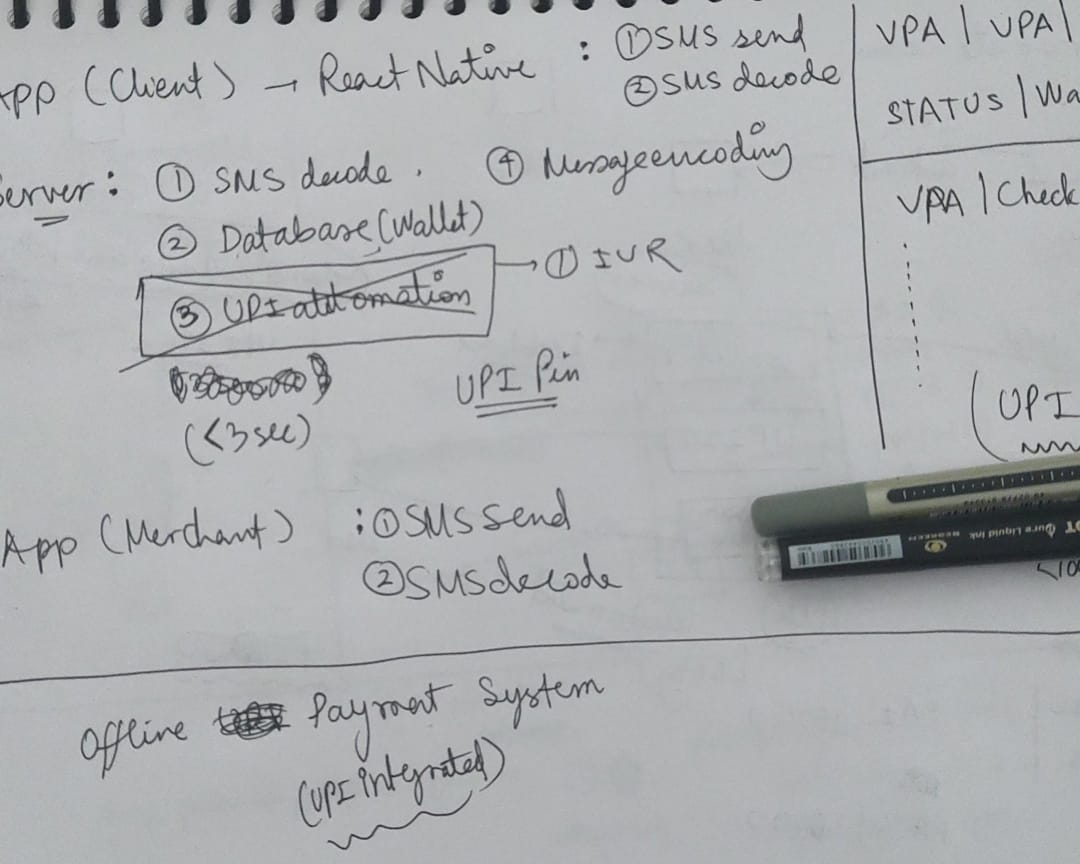
Then I discussed it with my team members, and we made a few changes to the architecture to make it more modular and scalable. I also added a few more components to the system, such as the Celeris SMS gateway, which was the core component of the whole system, as it was the middleman which connected the offline app to the online server.
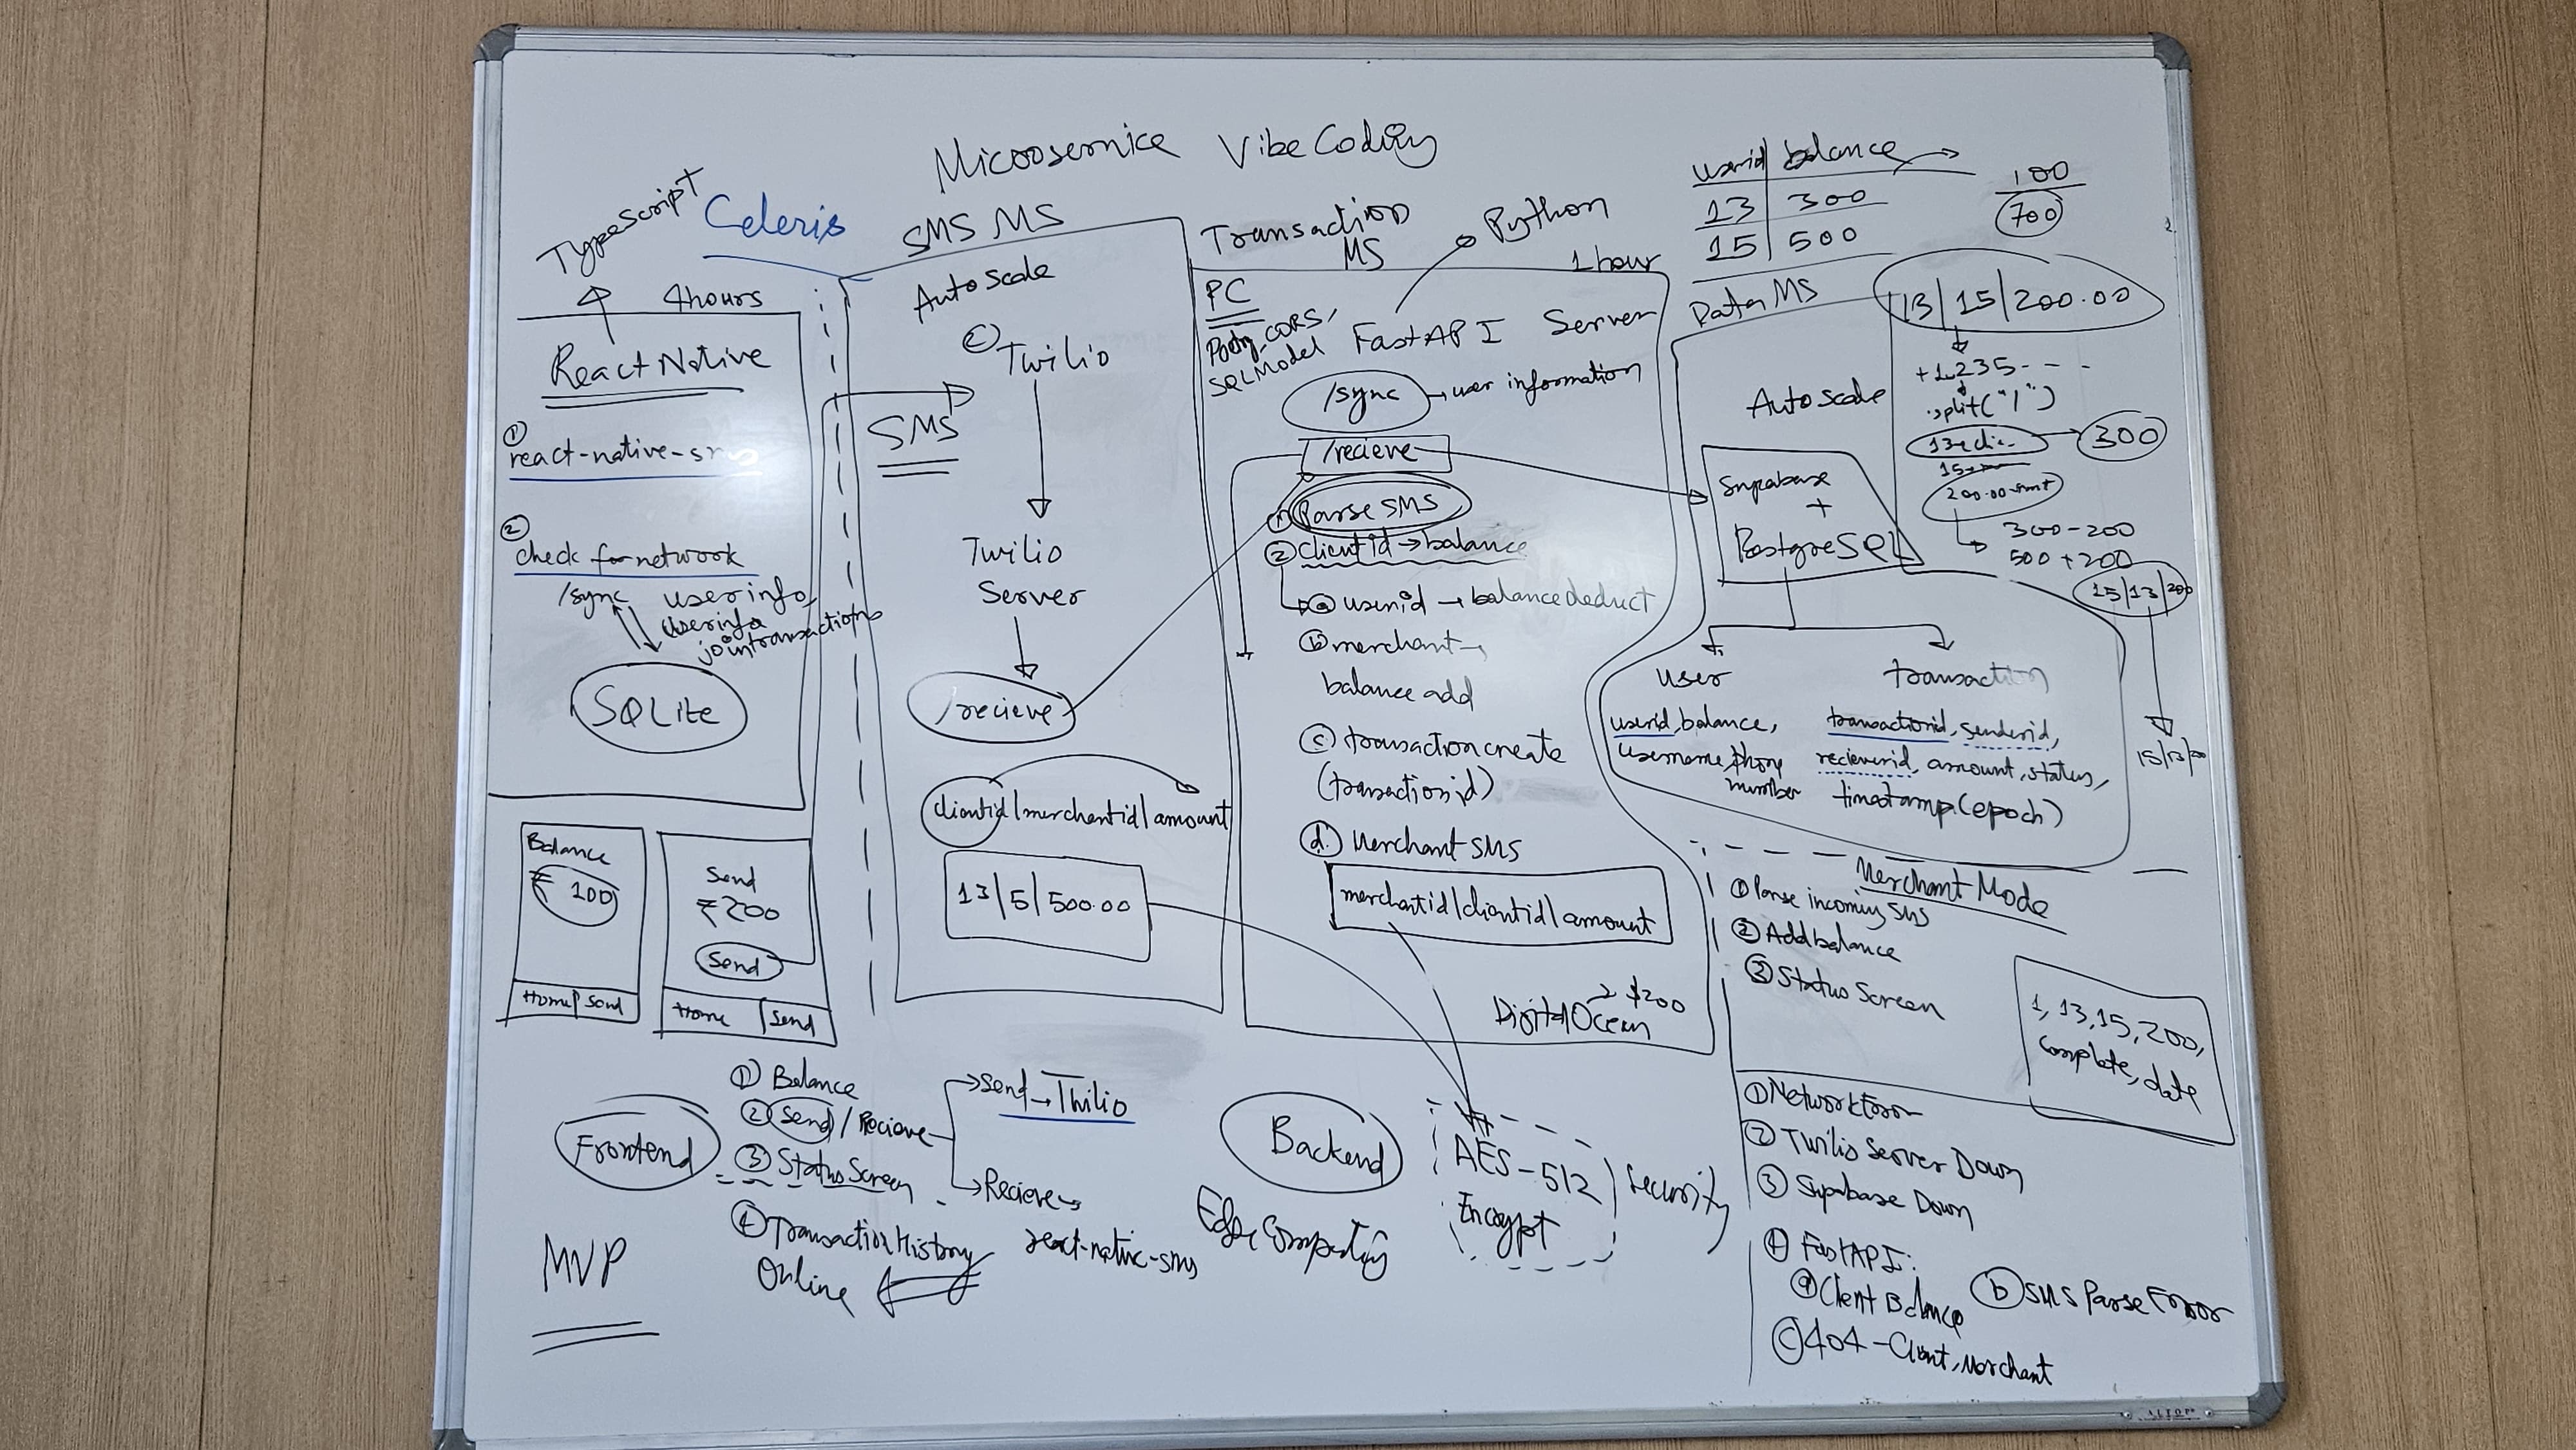
After this I had to research a little bit more about the technologies that I would be using in the system, and how they would work together. I had to make sure that everything was compatible with each other, and that the system would be able to handle the load of the users. I also decided on what technologies we would be using for the different components of the system, such as the Celeris app, the Celeris server, and the Celeris database. I had to make sure that everything was compatible with each other, and that the system would be able to handle the load of the users. Then after brainstorming a lot, I came up with the final architecture of the system, which was then built upon to create the final product.
Celeris SMS Gateway: The Core Component
The Celeris SMS gateway was the core component of the whole system, as it was the middleman which connected the offline app to the online server. It was designed to be simple and easy to use, with a clean and intuitive interface. The SMS gateway was built using NanoHTTPD, a lightweight HTTP server for Java, and was designed to be modular, with different components for different features.
All of the code snippets being discussed in this section are available on the GitHub repository of the Celeris SMS gateway.
SMS Receiver
This was the component of the SMS gateway that ran in the background and listened for incoming SMS messages. It was a very basic component, which would listen for incoming SMS messages and then send them to the server using a POST request.
@Override
public void onReceive(Context context, Intent intent) {
    if (intent.getAction() != null &&
            intent.getAction().equals(Telephony.Sms.Intents.SMS_RECEIVED_ACTION)) {

        Bundle bundle = intent.getExtras();
        if (bundle != null) {
            SmsMessage[] messages;
            messages = Telephony.Sms.Intents.getMessagesFromIntent(intent);

            for (SmsMessage smsMessage : messages) {
                if (smsMessage != null) {
                    String messageBody = smsMessage.getMessageBody();
                    sendToServer(messageBody);
                }
            }
        }
    }
}
This is a BroadcastReceiver that listens for incoming SMS messages on the Android device. When the system receives a text message, it broadcasts an intent with the action SMS_RECEIVED_ACTION.
- Intent Filtering: The code first checks if the received intent is specifically for SMS messages by verifying the action matches
Telephony.Sms.Intents.SMS_RECEIVED_ACTION. This ensures it only processes actual SMS events and ignores other broadcast intents. - Data Extraction: When an SMS intent is received, the message data is stored in the intent’s extras as a Bundle. The code retrieves this Bundle, which contains the raw SMS data from the telephony system.
- Message Parsing: Using
Telephony.Sms.Intents.getMessagesFromIntent(), the code extracts the SMS messages from the intent. This method handles the parsing of the telephony data and returns an array ofSmsMessageobjects. Multiple messages can arrive in a single intent, especially for long messages that get split into multiple parts. - Content Processing: For each SmsMessage object, the code extracts the message body using
getMessageBody()and immediately calls thesendToServer()method.
private void sendToServer(String messageBody) {
    new Thread(() -> {
        try {
            URL url = new URL("https://41cf-122-187-117-179.ngrok-free.app/sms-webhook/");
            HttpURLConnection conn = (HttpURLConnection) url.openConnection();
            conn.setRequestMethod("POST");
            conn.setRequestProperty("Content-Type", "application/x-www-form-urlencoded");
            conn.setDoOutput(true);

            String formData = "Body=" + URLEncoder.encode(messageBody, "UTF-8");

            OutputStream os = conn.getOutputStream();
            os.write(formData.getBytes());
            os.flush();
            os.close();

            int responseCode = conn.getResponseCode(); // TODO: Use later for debugging
        } catch (Exception e) {
            e.printStackTrace();
        }
    }).start();
}
This method is responsible for sending the received SMS message to the Celeris server. It does this by creating a new thread to handle the network operation, ensuring that the main UI thread remains responsive.
- Threading: The method creates a new thread to handle the HTTP request. This is essential because network operations are blocking and would freeze the main UI thread if executed synchronously. Android also enforces this by throwing a
NetworkOnMainThreadExceptionif we attempt network calls on the main thread. - HTTP Connection Setup: It establishes an
HttpURLConnectionto your ngrok tunnel URL, which is exposing your local Celeris backend server to the internet. The connection is configured for a POST request with the content type set toapplication/x-www-form-urlencoded, which is the standard format for HTML form submissions. - Data Encoding: The SMS message body is URL-encoded using
URLEncoder.encode()to handle special characters properly, then formatted as form data with the parameter name “Body”. This ensures characters like spaces, ampersands, or other symbols in the SMS don’t break the HTTP request. - Request Transmission: The encoded form data is written to the connection’s output stream as bytes. The
flush()call ensures all data is sent immediately, and the stream is properly closed to release resources. - Response Handling: The code retrieves the HTTP response code, though it’s currently unused (marked as TODO for debugging). This could be useful for error handling or logging successful transmissions.
- Error Management: The entire operation is wrapped in a try-catch block to handle potential network failures, malformed URLs, or encoding issues without crashing the application.
This method bridges the gap between the Android SMS system (offline) and the web backend (online), converting local SMS data into HTTP requests that the server can process.
SMS Sender
This was the component of the SMS gateway that would send SMS messages to the users. It was a very basic component, which would take the message body and the phone number as input, and then send the SMS message to the user using a POST request. This was exposed to the local network using a simple REST API, which would have a POST endpoint to send SMS messages.
public SmsHttpServer(int port) throws IOException {
    super(port);
    start(NanoHTTPD.SOCKET_READ_TIMEOUT, false);
}
This is the constructor for the SmsHttpServer class, which extends NanoHTTPD. It initializes the HTTP server on a specified port and starts it with a read timeout.
- Port Initialization: The constructor takes an integer
portas a parameter, which specifies the port number on which the server will listen for incoming HTTP requests. This allows you to run the server on any available port. - Superclass Constructor: It calls the superclass constructor (
super(port)) to initialize the NanoHTTPD server with the specified port. This sets up the underlying server infrastructure. - Server Start: The
start()method is called with two parameters:NanoHTTPD.SOCKET_READ_TIMEOUT: This sets the read timeout for incoming socket connections, ensuring that the server does not hang indefinitely waiting for data.false: This indicates that the server should not run in a separate thread, meaning it will block the current thread until it is stopped. This is useful for simple applications or testing but may need to be adjusted for production use.
@Override
public Response serve(IHTTPSession session) {
    if (Method.POST.equals(session.getMethod())) {
        try {
            Map<String, String> body = new HashMap<>();
            session.parseBody(body);
            JSONObject json = new JSONObject(Objects.requireNonNull(body.get("postData")));
            String phoneNumber = json.getString("phoneNumber");
            String message = json.getString("message");

            sendSms(phoneNumber, message);
            return newFixedLengthResponse("SMS Sent");
        } catch (Exception e) {
            return newFixedLengthResponse(Response.Status.INTERNAL_ERROR, "text/plain", e.getMessage());
        }
    }
    return newFixedLengthResponse("SMS Gateway Running...");
}
This method is the core of the SmsHttpServer class, handling incoming HTTP requests. It checks if the request method is POST, processes the request body, and sends an SMS message based on the provided data.
- HTTP Method Filtering: The method first checks if the incoming request is a POST request using
Method.POST.equals(session.getMethod()). Only POST requests are processed for SMS sending, while other HTTP methods (GET, PUT, etc.) receive a default response indicating the gateway is running. - Request Body Parsing: For POST requests, it creates a
HashMapto store the parsed body data and callssession.parseBody(body). This extracts the raw POST data from the HTTP request and stores it in the map with the key “postData”. - JSON Data Extraction: The raw POST data is retrieved from the
HashMapand parsed as a JSON object using newJSONObject(). The code expects the request body to contain JSON with two fields:phoneNumber: The recipient’s phone numbermessage: The SMS message content to send
- SMS Transmission: Once the phone number and message are extracted from the JSON, the method calls
sendSms(phoneNumber, message)to actually send the SMS using the Android SMS APIs. - Response Handling: The method returns different HTTP responses based on the outcome:
- Success: Returns “SMS Sent” with HTTP 200 status
- Error: Returns the exception message with HTTP 500 (Internal Server Error) status
- Non-POST requests: Returns “SMS Gateway Running…” indicating the server is operational
- Error Management: The entire POST processing logic is wrapped in a try-catch block to handle JSON parsing errors, missing fields, or SMS sending failures gracefully without crashing the server.
This creates a simple REST API endpoint that accepts JSON payloads and converts them into SMS messages sent through the Android device.
private void sendSms(String phoneNumber, String message) {
    SmsManager smsManager = SmsManager.getDefault();
    smsManager.sendTextMessage(phoneNumber, null, message, null, null);
}
This method is responsible for sending an SMS message using the Android SmsManager class. It takes two parameters: the recipient’s phone number and the message content.
- SmsManager Initialization: It retrieves the default
SmsManagerinstance usingSmsManager.getDefault(). This class provides methods to send SMS messages, manage SMS queues, and handle delivery reports. - SMS Sending: The
sendTextMessage()method is called with five parameters:phoneNumber: The recipient’s phone numbernull(service center address): Usually null to use the default SMS service centermessage: The actual text content of the SMSnull(sent PendingIntent): Could be used to receive notification when the SMS is sentnull(delivery PendingIntent): Could be used to receive notification when the SMS is delivered
This method serves as a simple wrapper around the Android SMS API, enabling the HTTP server to send SMS messages to any phone number specified in incoming requests. Note that this requires the SEND_SMS permission in the Android manifest.
Main Activity
public class MainActivity extends AppCompatActivity {

    @Override
    protected void onCreate(Bundle savedInstanceState) {
        super.onCreate(savedInstanceState);
        EdgeToEdge.enable(this);
        setContentView(R.layout.activity_main);
        ViewCompat.setOnApplyWindowInsetsListener(findViewById(R.id.main), (v, insets) -> {
            Insets systemBars = insets.getInsets(WindowInsetsCompat.Type.systemBars());
            v.setPadding(systemBars.left, systemBars.top, systemBars.right, systemBars.bottom);
            return insets;
        });

        try {
            new SmsHttpServer(8080);
        } catch (IOException e) {
            e.printStackTrace();
        }
    }
}
This is the main activity of the Celeris SMS gateway application, which serves as the entry point for the Android app. It initializes the user interface and starts the HTTP server that will handle incoming SMS requests.
- SMS Server Initialization: The critical part for the SMS gateway functionality - it instantiates a new
SmsHttpServeron port 8080. This starts the HTTP server that will listen for incoming requests to send SMS messages. - Error Handling: The server initialization is wrapped in a try-catch block to handle potential
IOExceptionthat could occur during server startup (such as port already in use or network issues).
This activity essentially serves as the bootstrap for the SMS gateway, starting the HTTP server that makes the Android device accessible as an SMS endpoint on the local network. Once launched, other applications can send POST requests to http://[device-ip]:8080 to trigger SMS messages through the device.
Celeris Backend: The Server
The Celeris backend was the server component of the system. It was designed to be modular and scalable, with different components for different features, such as managing users, processing transactions, and sending notifications. The server was built using FastAPI, a modern web framework for building APIs with Python. This server was the heart of the whole system, as it was responsible for managing users, processing transactions, and sending notifications. This was the part of the system that had to be always online, as it was the one that would process the transactions and send notifications to the users based on the requests made by the SMS gateway.
All of the code snippets being discussed in this section are available on the GitHub repository of the Celeris backend.
SMS Parser
The SMS parser is a crucial component that extracts relevant information from incoming SMS messages. It uses regular expressions to identify the client ID, receiver ID, and amount from the message body.
@dataclass
class SMSData:
    client_id: str
    receiver_id: str
    amount: float

def parse_sms_message(message: str) -> Optional[SMSData]:
    try:
        # Split the message by the delimiter and remove any whitespace
        parts = [part.strip() for part in message.split("|")]

        # Verify we have exactly 3 parts
        if len(parts) != 3:
            return None

        client_id, receiver_id, amount_str = parts

        # Convert amount to float and validate
        amount = float(amount_str)
        if amount <= 0:
            return None

        # Validate IDs are not empty
        if not client_id or not receiver_id:
            return None

        return SMSData(
            client_id=client_id,
            receiver_id=receiver_id,
            amount=amount
        )

    except Exception as e:
        print(f"Error parsing SMS message: {str(e)}")
        return None
This function takes an SMS message as input and attempts to parse it into a structured SMSData object. It expects the message to be formatted as client id | receiver id | amount.
- Data Structure Definition: The
SMSDatadataclass defines a structured format for parsed SMS payment data, containing three essential fields:client_id(sender),receiver_id(recipient), andamount(transaction value). This provides type safety and clear data organization for payment transactions. - Message Format Specification: The parser expects SMS messages in a specific pipe-delimited format:
client_id | receiver_id | amount. This standardized format allows the SMS Gateway to send payment instructions via simple text messages that the system can reliably interpret. - Input Validation and Parsing: The function splits the incoming message by the pipe delimiter and strips whitespace from each component. It performs several validation checks:
- Ensures exactly three parts are present (no more, no less)
- Validates that both client and receiver IDs are non-empty strings
- Converts the amount string to a float and verifies it’s positive
- Error Handling: The entire parsing operation is wrapped in a try-catch block to handle potential exceptions like invalid number formats or unexpected message structures. If any validation fails or an exception occurs, the function returns
Nonerather than crashing. - Return Value: On successful parsing, it returns a populated
SMSDataobject containing the validated transaction details. If parsing fails for any reason, it returnsNone, allowing the calling code to handle invalid messages gracefully.
This parser enables the SMS gateway to initiate payments by sending SMS messages like 123 | 456 | 50.00, which the system can then process as a payment request from the user with ID 123 to the user with ID 456 for 50.00 rupees. The validation ensures only properly formatted payment instructions are processed.
Authentication
The code is not production-grade secure, and is only meant for educational purposes. It is not recommended to use this code in a production environment without proper security measures. The code can be found here.
For the authentication system in this project, we implemented a minimal signup and login flow using FastAPI and PostgreSQL. While not production-grade secure (passwords are stored in plaintext and no token-based auth is implemented), it served the project’s needs as a lightweight placeholder. There was not enough time to implement a full-fledged authentication system, but this can be easily extended in the future.
Database Tables & Schema
This system uses two main tables:
-
auth_table: Stores basic authentication info.CREATE TABLE auth_table ( id SERIAL PRIMARY KEY, email TEXT UNIQUE NOT NULL, password TEXT NOT NULL, name TEXT, phoneNumber TEXT ); -
users: Stores user-specific metadata like balance. When a user signs up, an entry is created in both tables.CREATE TABLE users ( id INTEGER PRIMARY KEY REFERENCES auth_table(id), balance NUMERIC DEFAULT 0 );
Request Models
SignupRequest: Acceptsemail,password,name, andphoneNumberLoginRequest: Acceptsemailandpassword
These use Pydantic models for type validation.
Endpoints
-
POST /auth/signup- Check if the email already exists.
- Insert new user into
auth_table. - Commit the transaction and fetch the
user_id. - Call
create_user(...)to initialize the user in theuserstable (likely with default balance0).
create_user(user_id, 0, payload.name, payload.phoneNumber) -
POST /auth/login- Lookup the user by email.
- Compare passwords (plain comparison; no hashing).
- If matched, fetch the user’s balance from
userstable. - Return basic user info in the response.
Security Disclaimer
This auth system was intentionally kept simple:
- No password hashing (e.g., bcrypt)
- No session management or tokens (e.g., JWT)
- No rate-limiting or brute-force protection
This was just a side module for internal functionality, not meant for public production use, as during demonstration, we had to show the basic functionality of the app. In a real-world scenario, you would never store passwords in plaintext or expose sensitive user data without proper security measures.
Utilities
-
get_db_connection()def get_db_connection() -> Tuple[Any, Any]: """Create and return a database connection and cursor""" connection = psycopg2.connect(**DB_CONFIG) cursor = connection.cursor() return connection, cursorThis utility loads database credentials from a
.envfile usingpython-dotenv, then establishes a PostgreSQL connection usingpsycopg2. It returns both theconnectionand thecursorfor executing SQL queries. This keeps DB access clean and reusable across different modules. -
create_user()Initializes user-specific data. This utility function inserts a new entry into the
userstable after signup. It receives theid,balance,name, andphoneNumber, opens a DB connection, and performs the insert operation.def create_user(id: int, balance: int, name: str, phoneNumber: str): ... cursor.execute(""" INSERT INTO users (id, balance, name, "phoneNumber") VALUES (%s, %s, %s, %s) """, (id, balance, name, phoneNumber)) ...It’s called right after a successful signup to initialize the user’s extended profile. The
userstable is used to store additional data likebalancewhich isn’t part of the core auth system.
Transaction Service: Core of Celeris Payments
I will give a brief overview of the code in this section, as it is quite long and complex. The code can be found here. I highly recommend reading the code to understand how it works, as it is the core of the Celeris payments system.
This module powers the actual money flow within the Celeris platform - checking balances, transferring money between users, recording transactions, and triggering SMS notifications after a transfer. Here’s a breakdown of the key functions:
-
check_balance(client_id, amount)Checks whether a user has sufficient balance to make a payment.
cursor.execute("SELECT balance FROM users WHERE id = %s;", (client_id,))- Returns
Trueif the user has enough funds, otherwiseFalse. - Used to validate transactions before initiating them.
- Returns
-
generate_sms(id, amount, status, typ)Triggers an external SMS notification by sending a request to the Celeris SMS gateway.
data = { 'phoneNumber': f"+91{phoneNumber}", 'message': f"{int(amount)}|{status}|{typ}" } requests.post(url, json=data)- Fetches the user’s phone number from the DB.
- Sends a structured message like
500|SUCCESS|SENDto a the SMS gateway to send back to the user/merchant based on the type of transaction (provided by the argumenttyp). The IP address of the SMS gateway is exposed to the internet using ngrok, so that it can be accessed from anywhere. The IP address is stored in the.envfile. - Used for user-facing feedback after a transaction.
-
create_transaction(sender_id, receiver_id, amount, status)Records a transaction in the
transactionstable.INSERT INTO transactions (sender_id, receiver_id, amount, status)- Stores who paid whom, how much, and with what status (
SUCCESS,FAILED, etc.). - This is the official ledger for internal auditing.
- Stores who paid whom, how much, and with what status (
-
update_user(sender_id, receiver_id, amount)Performs the actual money movement by:
- Decreasing the sender’s balance
- Increasing the receiver’s balance
UPDATE users SET balance = balance - %s WHERE id = %s UPDATE users SET balance = balance + %s WHERE id = %s- Runs both updates in a transaction block (
BEGIN…COMMIT) - Uses
RETURNING idto ensure both updates succeeded - Rolls back if anything fails
Design Notes
- The use of
BEGINandconn.rollback()ensures consistency - either both balances change, or none do. generate_sms()is decoupled from the DB layer, making it easy to replace or expand into richer notifications later.- All DB operations go through the centralized
get_db_connection()utility.
This file is the financial engine behind the scenes, ensuring transactions are safe, logged, and traceable - even if the frontend goes offline or fails. It reflects how Celeris prioritizes atomicity and user feedback in offline-first environments.
Celeris API: The RESTful Interface
This is the entry point for all external interactions with the Celeris backend. It exposes the REST interface that listens for sync, transaction, and admin events. The API is built using FastAPI, which provides automatic OpenAPI documentation and easy integration with the transaction service.
All of the code snippets being discussed in this section are available here.
App Initialization
app = FastAPI(title="Payment API", description="API for handling payments via SMS")

app.add_middleware(
    CORSMiddleware,
    allow_origins=["*"],  # Allow all origins
    allow_credentials=True,
    allow_methods=["*"],  # Allow all HTTP methods
    allow_headers=["*"],  # Allow all headers
)

app.include_router(auth_router)- Enables CORS for all origins (useful in mobile/native dev environments).
- Mounts the
authrouter for handling signups or registrations. - Defines REST endpoints to:
- Sync user data
- Process payment SMS
- Add balance (admin or debug tool)
Sync Endpoint
@app.post("/sync")This endpoint is used to synchronize user data between the Celeris app and the backend server whenever the Celeris app user comes online.
 conn, cursor = get_db_connection()

cursor.execute('SELECT id, name, balance, "phoneNumber" FROM users WHERE id = %s;', (request.id,))
user = cursor.fetchone()
Fetches user details like name, balance, and phone number using the given ID. It returns a JSON response with the user’s data, which the Celeris app can use to update its local state.
SMS Webhook Endpoint
@app.post("/sms-webhook")This endpoint is the core of the Celeris payment system, where the SMS gateway sends incoming payment requests. It processes the SMS data, checks balances, and initiates transactions.
Flow:
- Parse message from
Bodyusingparse_sms_message() - Check sender balance
- If insufficient, record the transaction and respond with
402 - If sufficient, update balances atomically via
update_user - Log the transaction and trigger dual
generate_sms()calls (sender + receiver)
This powers the completely offline-first payment UX. The Celeris app can send payment requests via SMS, and the backend processes them without needing a live internet connection. The SMS gateway acts as the bridge between the offline app and the online server.
Add Balance Endpoint
@app.post("/addbalance")This endpoint is a simple admin tool to add balance to a user’s account. It accepts a JSON payload with id and amount, checks if the user exists, and updates their balance accordingly.
conn, cursor = get_db_connection()

cursor.execute("SELECT balance FROM users WHERE id = %s;", (request.user_id,))
user = cursor.fetchone()
...
current_balance = user[0]
new_balance = current_balance + request.amount

# Update balance
cursor.execute(
    "UPDATE users SET balance = %s WHERE id = %s;",
    (new_balance, request.user_id)
)
...
This is the only endpoint that allows modifying user balances directly, which is useful for debugging or testing purposes. It should be secured in a production environment to prevent unauthorized access.
Highlights
- All exceptions are caught and handled gracefully using FastAPI’s
HTTPException. - Uses central DB connection logic (
get_db_connection()), reducing boilerplate and easing testing. - The SMS parser and notification flow are modular, decoupling backend from SMS gateway logic.
- Acts as a coordinator that connects low-level transactional logic with high-level RESTful interfaces.
We expose the Celeris backend via ngrok, which allows us to access the backend from anywhere in the world. This is useful for testing and debugging purposes, as we can easily access the backend from our local machines without having to deploy it to a remote server. You can do it your way by deploying it to a remote server, or using a cloud provider like AWS, GCP, or Azure.
Celeris Database
The Celeris database is the backbone of the entire system, storing all user data, transaction history, and balances. It uses Supabase as the database provider, which is a managed PostgreSQL service that provides a RESTful API for accessing the database. This allows us to easily interact with the database from the Celeris app and the Celeris backend. This reduced our development time significantly, as we did not have to worry about setting up and managing the database ourselves. Supabase also provides a web interface for managing the database, which made it easy to visualize the data and run queries.
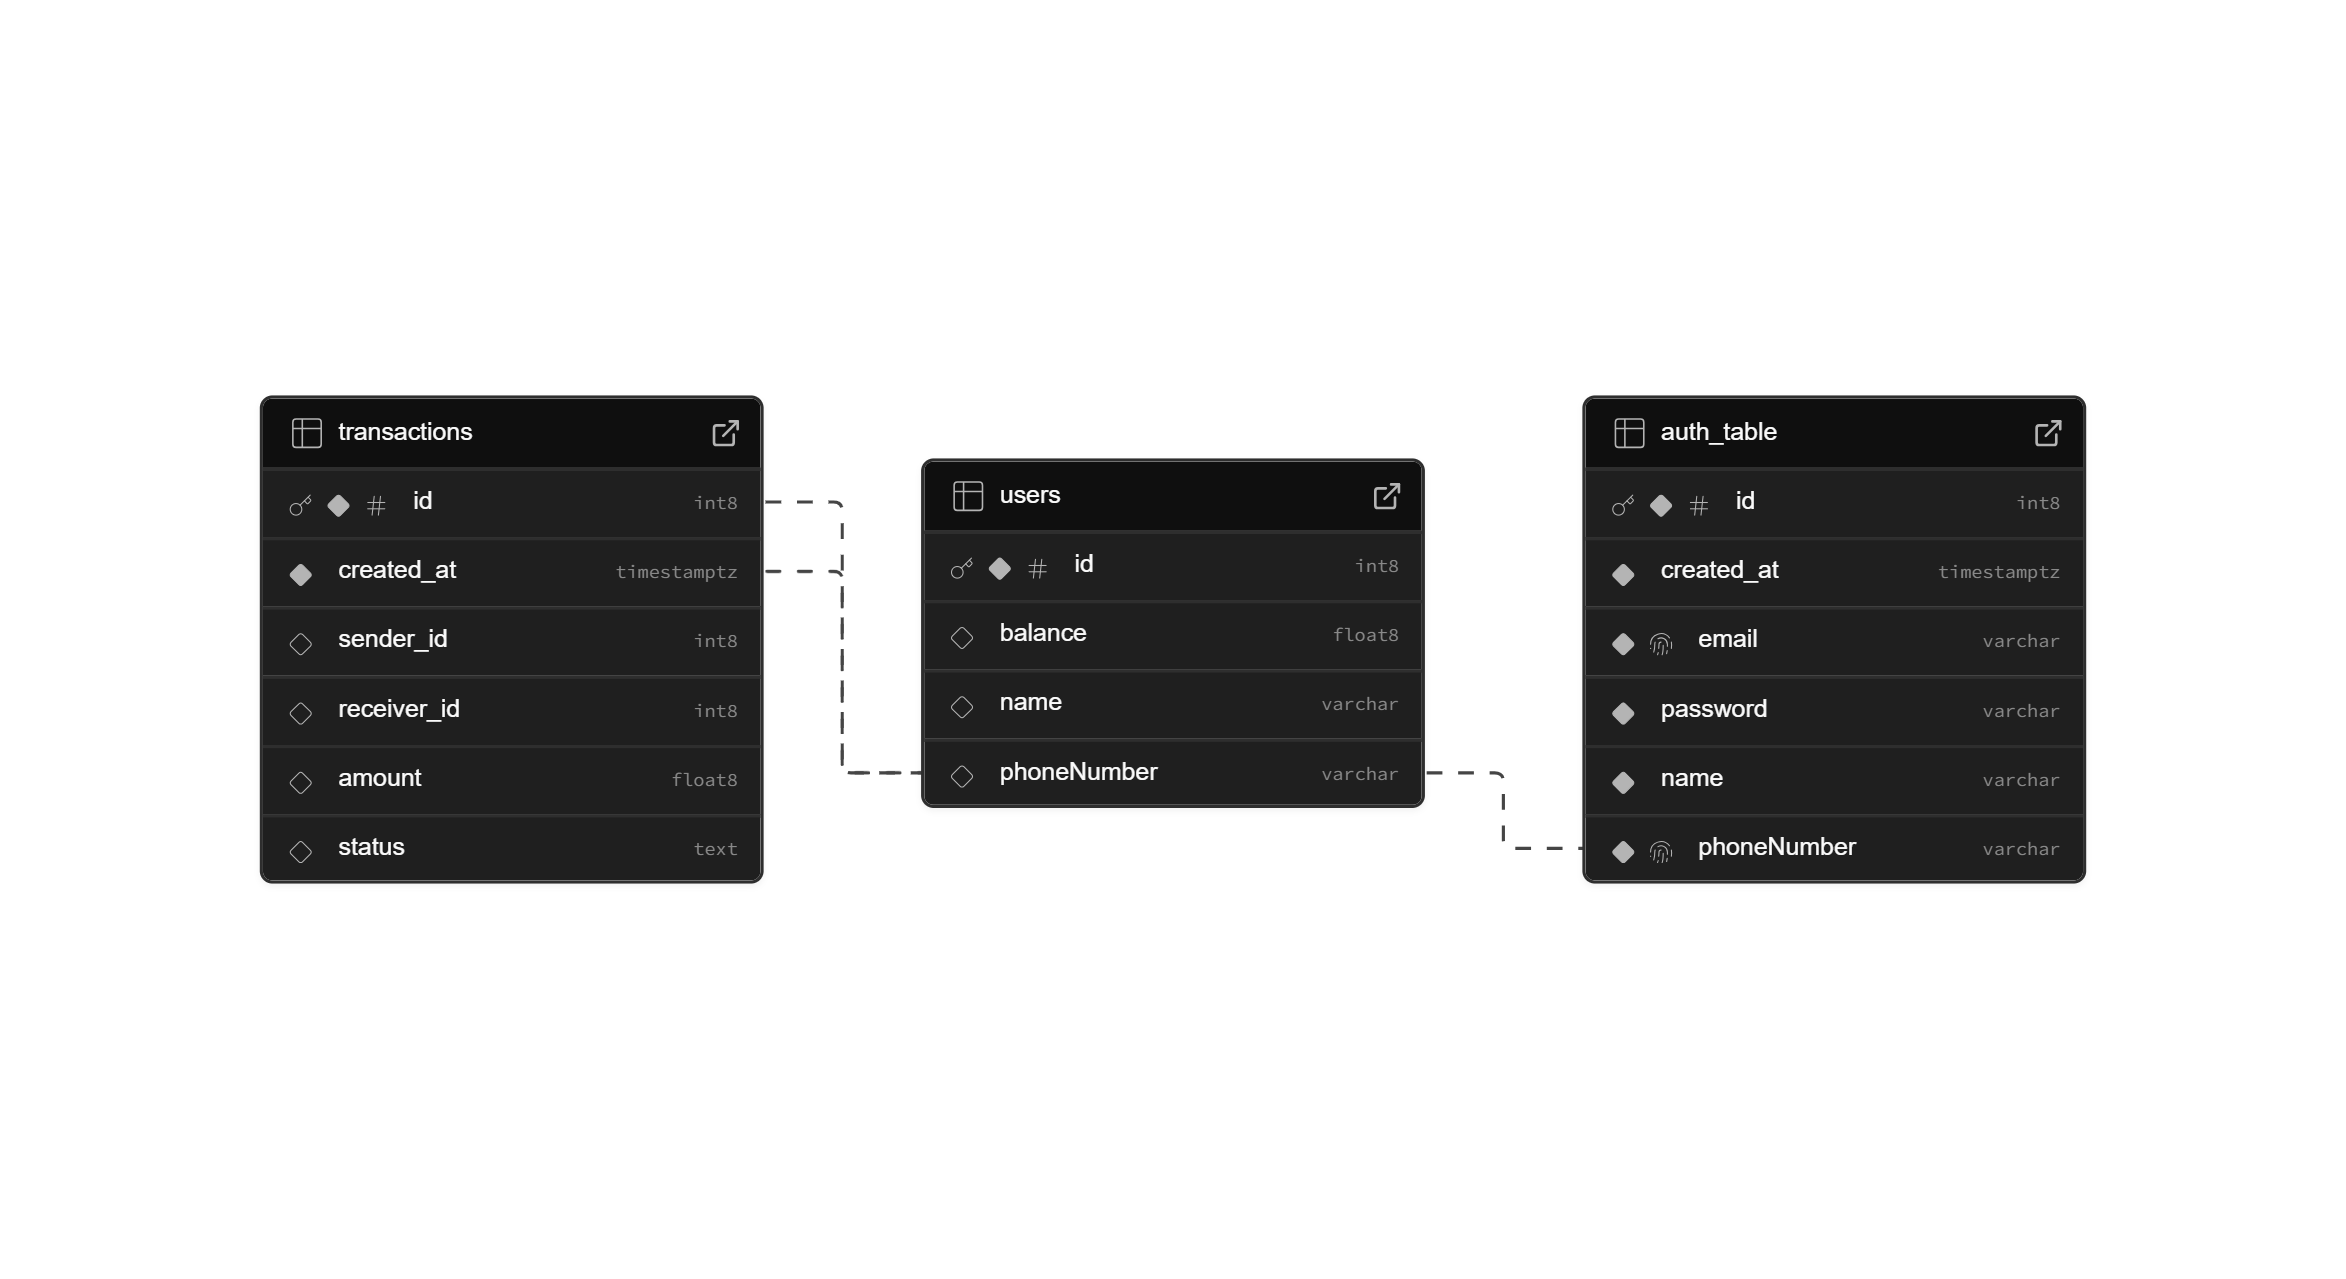
The users table
Stores user profile and wallet data:
id: Primary keyname: User’s namephoneNumber: Used to identify users via SMSbalance: Current wallet balance
The transactions table
Logs all transactions between users:
id: Primary keycreated_at: Timestamp of transactionsender_id: Foreign key tousers.idreceiver_id: Foreign key tousers.idamount: Transaction amountstatus: Transaction status (successful,failed,insufficient_balance)
The auth_table
Stores authentication credentials:
id: Primary keycreated_at: Timestamp of registrationemail: Login emailpassword: Password (stored in plaintext for simplicity in our case)name: User’s name (duplicated here for auth context)phoneNumber: Used for SMS and linking withusers
Notes
- The database is accessed via Supabase’s Postgres client and raw SQL queries.
- Transactions are recorded regardless of success to maintain a full audit trail.
- Phone numbers are the key link between SMS commands and user accounts.
- Balance updates and transaction logs are handled atomically to maintain consistency.
This schema is designed to be small, fast, and easy to query for a single-node offline-first payment ecosystem.
Celeris App: The Offline-cum-Online Client Application
The Celeris app is the client-side application that allows users to interact with the Celeris system. It is an Android application built using Kotlin, which allows users to send and receive payments via SMS. The app is designed to be offline-first, meaning that it can work without an internet connection, and will sync with the server when the user comes online.
Although we first thought of starting with React Native, we faced one major issue which bottlenecked the whole development: React Native does not allow you to send SMS messages directly from the app, as it requires the user to manually select the SMS app to send the message. Even Flutter did not have this feature. This was a major blocker for us, as we wanted to send SMS messages directly from the app without any user intervention. So, we decided to build the app using Kotlin, which allows us to send SMS messages directly from the app using the Android SMS APIs.
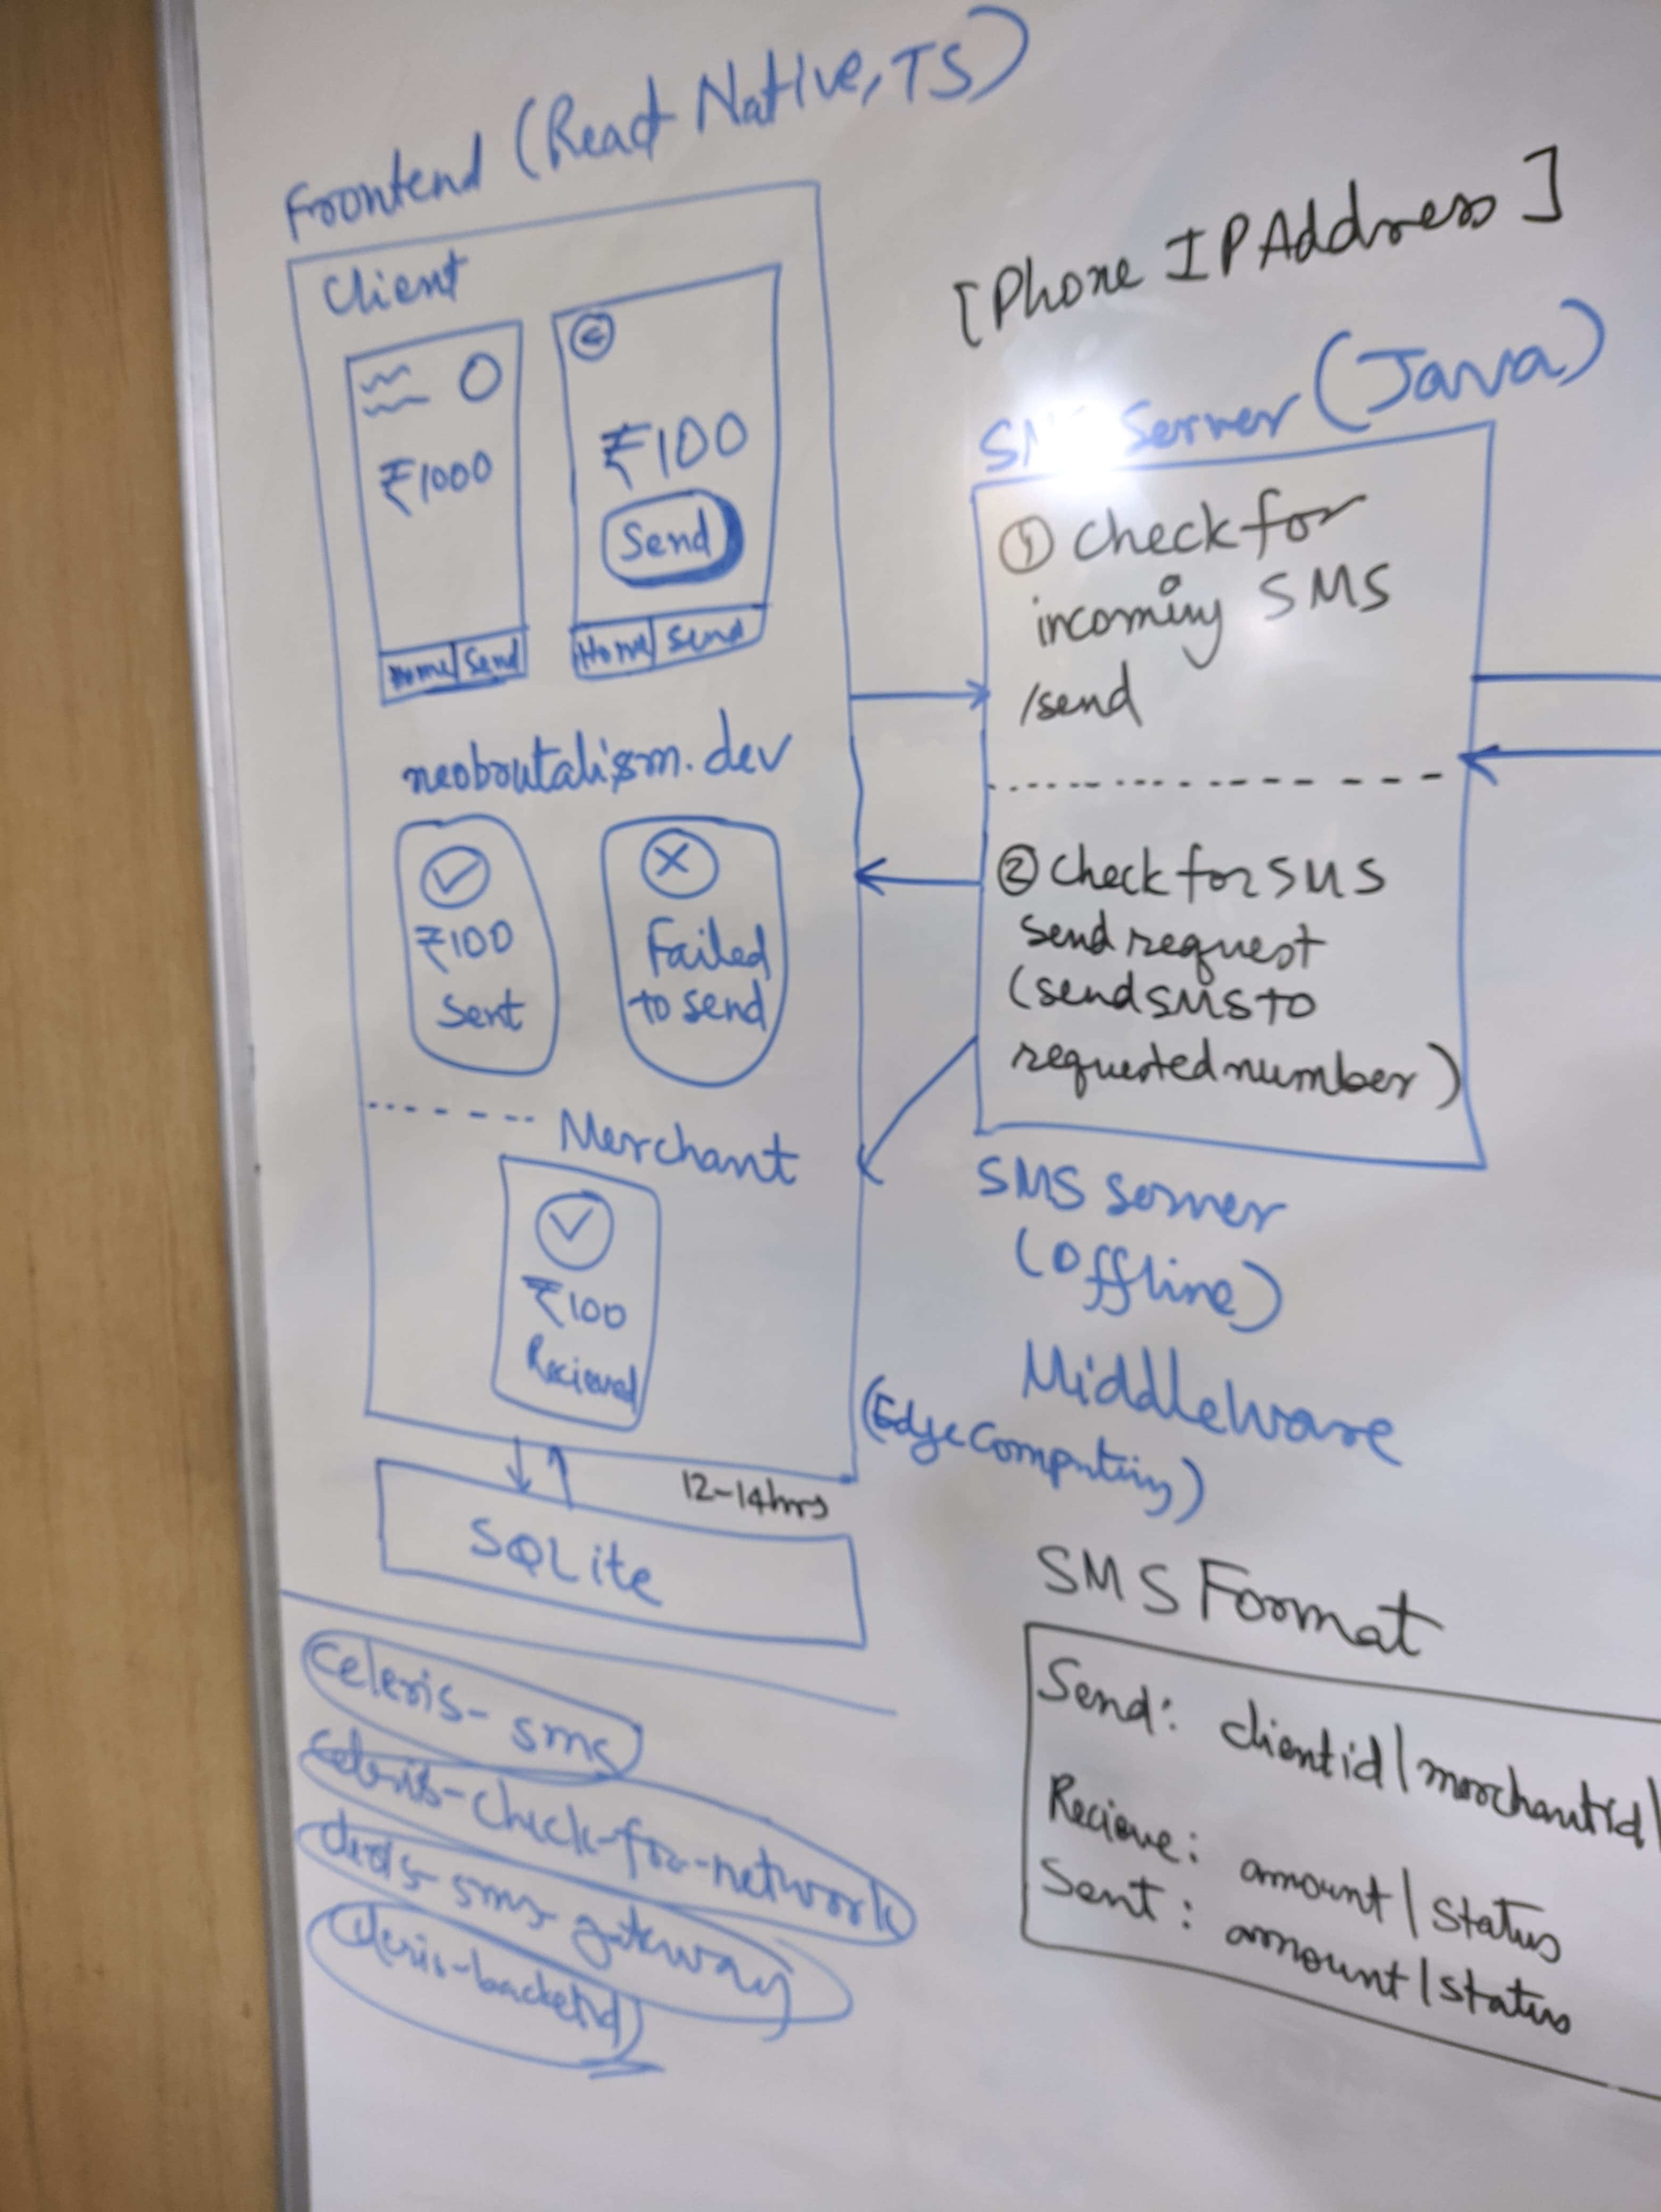
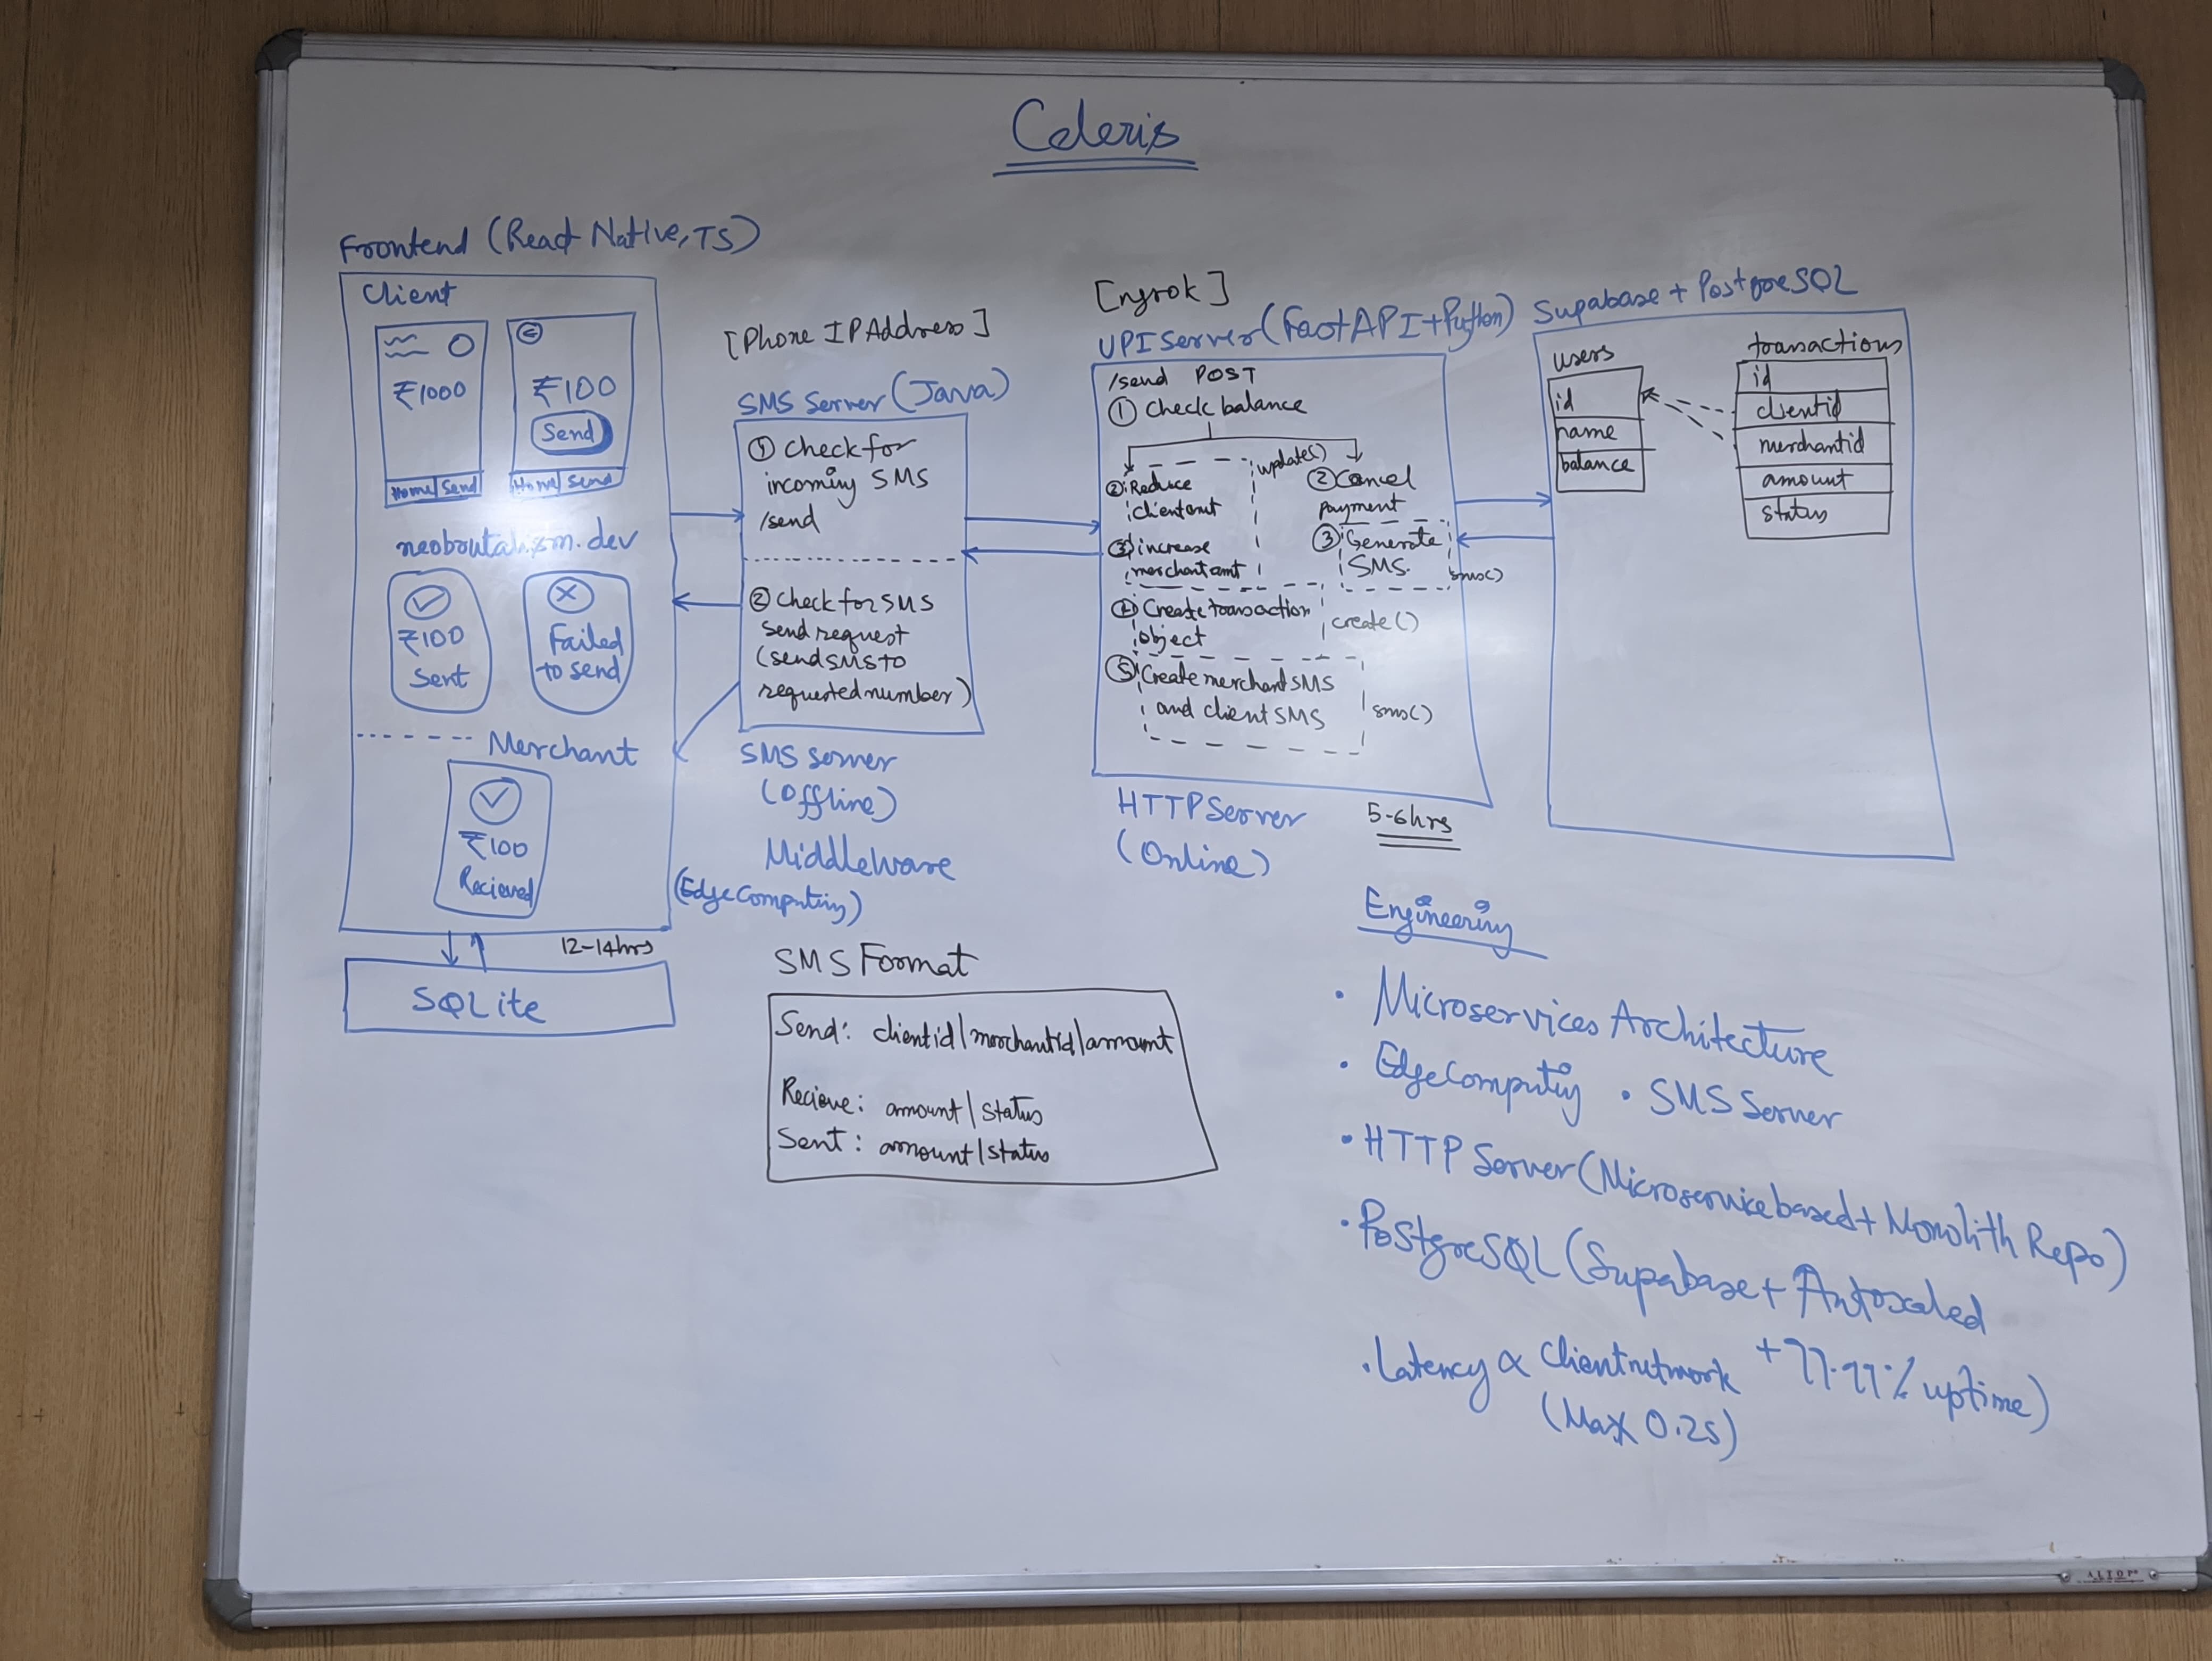
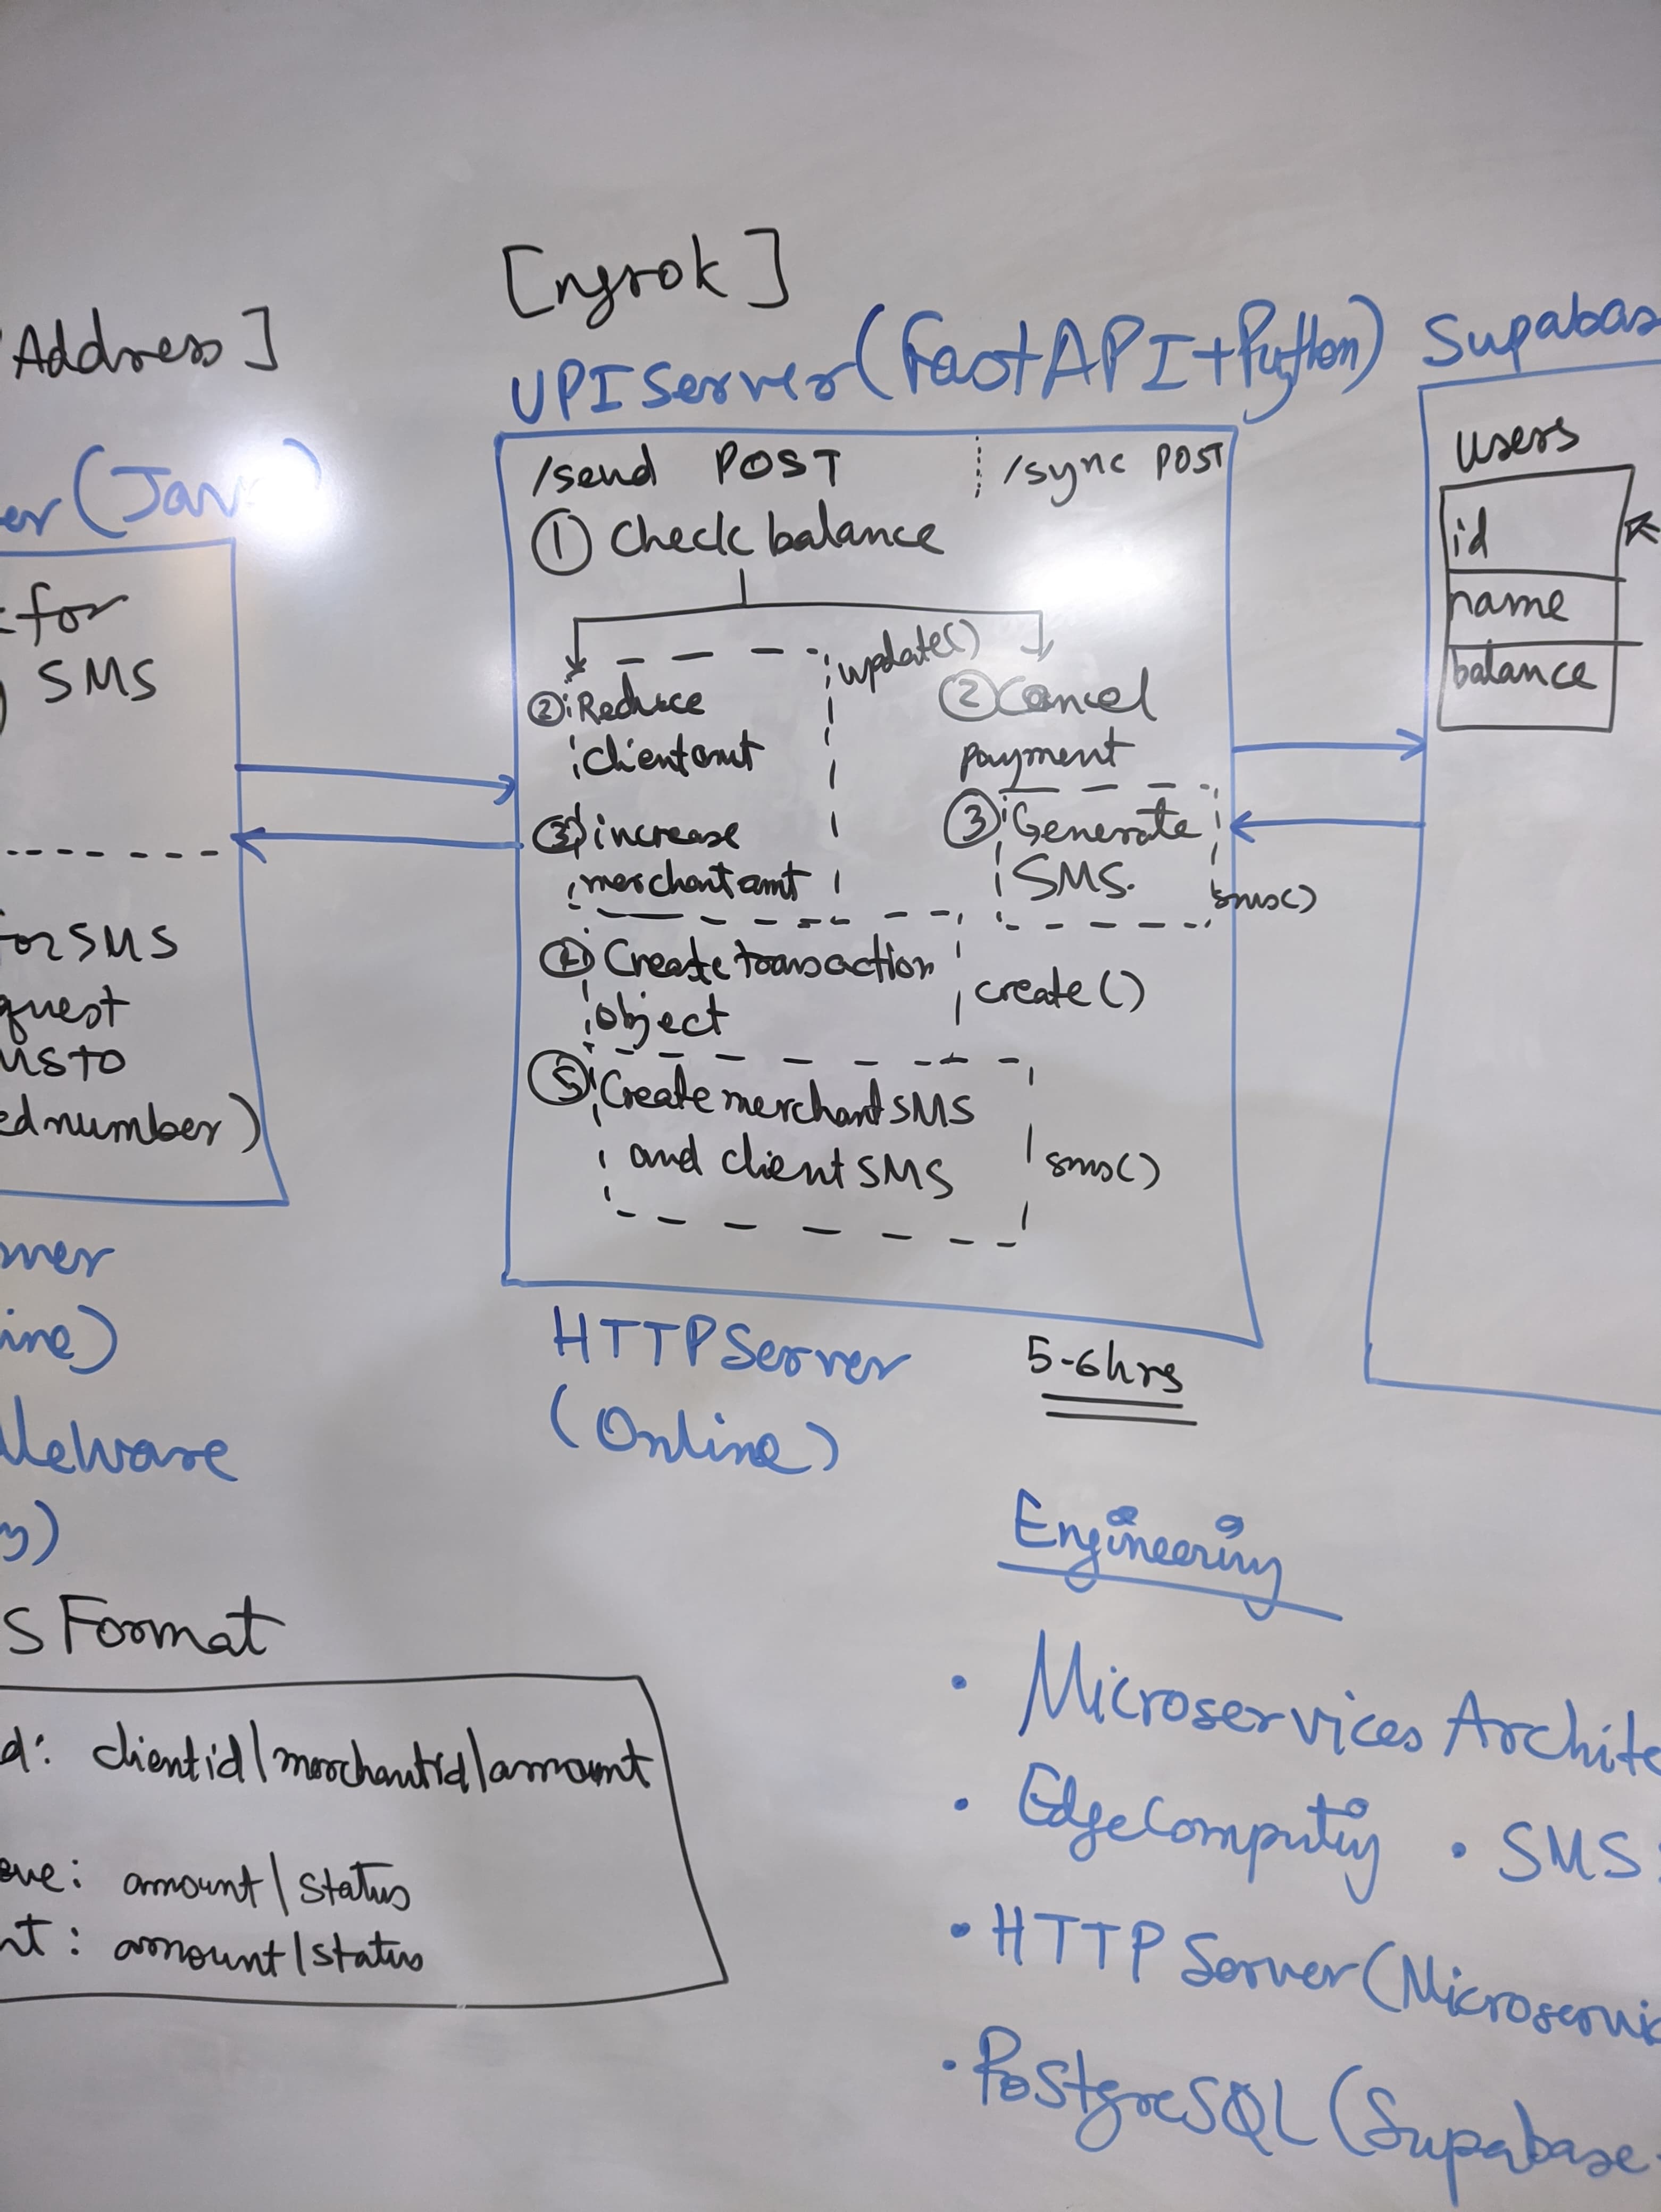
This architecture image for the frontend is very basic, and the app evolved a lot during the whole development process, but you can still take a look at it for reference.
It is not possible to explain the whole source code, but I will be explaining the key components of the app, and how they work together to create the Celeris system. The code can be found here. I highly recommend going through the code to understand how it works, as it is the best way to learn how the app works. You can have the code open of the section I’m explaining, and follow along with the explanation.
Libraries and Dependencies
- The app uses ConstraintLayout and Material Components for UI.
- Lottie is used for lightweight animations during transaction feedback and loading states.
- ZXing (
com.google.zxing:core) is used for QR code scanning functionality, allowing users to scan QR codes to initiate payments. - Retrofit is used for network requests to the Celeris backend, allowing the app to communicate with the server when online.
UI Components
- The app has a simple and intuitive user interface, with a bottom navigation bar that allows users to switch between different sections of the app.
- It uses Material Design components to provide a consistent and modern look and feel. It uses ConstraintLayout for flexible and responsive layouts, ensuring the app looks good on different screen sizes and orientations.
- Then, it uses Lottie animations to provide visual feedback during transactions and loading states.
- It uses Fragment-based navigation to switch between different sections of the app instead of Activities, which allows for smoother transitions and better state management.
- It uses Android Navigation Component for handling navigation between different screens, making it easier to manage back stack and going to previous screens.
SQLite Database Helpers
The app uses SQLite to store user information and auth information locally. This allows the app to function offline and sync with the server when the user comes online. This is not a secure way to store sensitive information, but it is sufficient for the purpose of this project. The SQLite schema and access logic are encapsulated in helper classes.
AuthDatabaseHelper
AuthDatabaseHelper handles authentication-related data, primarily storing the currently logged-in user’s metadata. It inherits from SQLiteOpenHelper and manages a single table: users.
Table Structure
CREATE TABLE users (
    id INTEGER PRIMARY KEY,
    name TEXT,
    balance INTEGER,
    email TEXT,
    phoneNumber TEXT
);
Key Methods:
onCreate()/onUpgrade(): Standard lifecycle methods for setting up and refreshing the database schema.checkDatabaseExists(Context): Boolean: Utility to verify whether the database file exists. Useful for conditional flows on first install or logout.saveUser(...): Inserts a new user row into the table.isUserLoggedIn(): Boolean: Checks if any user data exists, implying a logged-in state.getUser(): User?: Retrieves the stored user as a Kotlin model object. Returns null if no user exists.setBalance(balance: Int): Updates the balance column for the logged-in user.logoutUser(): Clears the users table, effectively logging out the user.
QR Code Database Helper
The DatabaseHelper class is a dedicated SQLiteOpenHelper used for persisting merchant QR codes locally. This is especially important in offline mode, allowing merchants to display their QR code without needing a network call.
Table Structure
CREATE TABLE merchant_qr (
    merchant_id TEXT PRIMARY KEY,
    qr_code BLOB
);merchant_id: Unique identifier for the merchant (used as the primary key).qr_code: QR code image stored as a BLOB.
Key Methods:
-
onCreate()/onUpgrade(): Handles initial schema creation and upgrading. Drops the table and recreates it on version change. -
saveQRCode(merchantId: String, qrCode: Bitmap)- Serializes the
Bitmapto a PNG byte array. - Uses
db.replace()to insert or update the QR code for the given merchant. - Enables idempotent writes.
- Serializes the
-
getQRCode(merchantId: String): Bitmap?- Reads the
BLOBdata from the database for the given merchant ID. - Decodes and returns it as a
Bitmapobject. - Returns
nullif no entry exists.
- Reads the
Notes:
- Efficient for quick QR retrieval in merchant dashboards or payment receive flows.
- QR codes are stored in binary to minimize transformation overhead at runtime.
This database helper is crucial for the offline-first design of the Celeris app, allowing merchants to continue accepting payments even without an internet connection. It ensures that QR codes are readily available and can be displayed instantly when needed.
User Model
The User class is a simple data model representing an authenticated user within the Celeris app. It is used primarily for local storage via SQLite (AuthDatabaseHelper) and in-memory user state management.
Fields
- id (
int): Unique identifier for the user (same as the Supabase user ID). - name (
String): User’s display name. - balance (
int): Current wallet balance (in rupees). - email (
String): Registered email address. - phoneNumber (
String): Registered mobile number.
Constructors
User(int id, String name, int balance, String email, String phoneNumber)Initializes a user object with all required fields.
Getters
getId(), getName(), getBalance(), getEmail(), getPhoneNumber()
Setters
setId(int id), setName(String name), setBalance(int balance), setEmail(String email), setPhoneNumber(String phoneNumber)
Notes
- Primarily used as a POJO (Plain Old Java Object) for local SQLite interactions.
- Designed with mutability in mind for balance updates and session management.
MainActivity
MainActivity is designed solely to redirect users based on their authentication status. It acts as the first screen that appears when the app is launched.
Logic Breakdown
val dbHelper = AuthDatabaseHelper(this)
if (dbHelper.isUserLoggedIn()) {
    val intent = Intent(this, SecureActivity::class.java)
    startActivity(intent)
    finish()
} else {
    val intent = Intent(this, AuthActivity::class.java)
    startActivity(intent)
    finish()
}- If
isUserLoggedIn():- Uses the local SQLite DB (
AuthDatabaseHelper) to check for a saved user session. - If a user exists in the local DB, they are assumed to be logged in offline or persistently and redirected to:
SecureActivity(main post-login dashboard)
- Uses the local SQLite DB (
- If not:
- User is routed to
AuthActivity, where they can log in or sign up.
- User is routed to
Authentication Flow Pipeline
         ┌────────────┐
         │MainActivity│
         └─────┬──────┘
               │
     ┌─────────▼─────────┐
     │Check Local DB for  │
     │isUserLoggedIn()    │
     └─────────┬──────────┘
               │
     ┌─────────▼─────────┐
     │      Yes          │────────────▶ SecureActivity
     │(Session exists)   │
     └─────────┬─────────┘
               │
     ┌─────────▼─────────┐
     │      No           │────────────▶ AuthActivity
     │(First time / out) │
     └───────────────────┘
Integration Perspective
MainActivityprovides clean isolation of authentication routing logic.- It avoids unnecessary logic duplication in
AuthActivityorSecureActivity. - Supports offline-first principles by trusting persisted local session data.
Authentication Flow
The authentication system in Celeris is designed to support both offline access and server-based verification. This hybrid approach is achieved using Android Fragments, Retrofit for network operations, and SQLite for local data persistence.
AuthActivity
AuthActivityis the launcher activity for unauthenticated users.- It loads the layout
activity_auth.xmlwhich contains a fragment container (R.id.auth_main). - On first launch (
savedInstanceState == null), it loads theLoginfragment by default. - The
enableEdgeToEdge()and window inset handling ensure modern UI compatibility across devices.
Login Flow
UI: Login fragment
- Collects email and password inputs.
- On “Login” click:
- Validates fields.
- Sends a
LoginRequestto the server via Retrofit. - On success: - Receives a
LoginResponsecontaining user information. - Stores user data usingAuthDatabaseHelper.saveUser(...). - Navigates toSecureActivity(the main authenticated screen). - On failure: - Shows appropriate
Toastfor failure or network errors.
Key Detail:
- Local user persistence means that after the first login, the user can be identified and allowed offline access.
AuthDatabaseHelper.isUserLoggedIn()is used to detect if a session exists locally.
Signup Flow
UI: SignUp Fragment
- Collects email, password, name, and phone number.
- On “Sign Up” click:
- Validates all fields.
- Sends a
SignupRequestto the server. - On success:
- User is created in the backend.
- Their info is immediately stored locally with a default balance of 0, and the same in the database.
- Navigates to
SecureActivity.
- On failure:
- Shows a
Toastwith error code or message.
- Shows a
Local Persistence: AuthDatabaseHelper
- Used by both
LoginandSignUpfragments. - Handles creation and management of a
userstable in theauthdbSQLite database. - Provides methods:
saveUser(...): Saves user info.getUser(): Retrieves the current user.isUserLoggedIn(): Checks if any user data exists.logoutUser(): Clears the local user record.setBalance(int): Updates balance offline.
Note: The SQLite method used here is not secure for storing sensitive info (like tokens or passwords), but is acceptable in this prototype where actual secrets are not persisted locally.
Navigation between Login & Signup
- Both
LoginandSignUpfragments can navigate to each other using Fragment transactions. - This avoids the need for separate activities and enables a smoother, single-activity navigation experience.
Final Notes
- Once authenticated, users are redirected to
SecureActivity, which represents the protected area of the app. - The SQLite-backed persistence allows the app to determine login status and user identity even without network access - a key requirement for offline-first design.
Post Authentication: SecureActivity
Once a user is successfully authenticated (via login or sign-up), the app launches the SecureActivity, which acts as the main dashboard for authenticated users.
Authentication Check (Offline-aware)
AuthDatabaseHelper(this).apply {
    if (!isUserLoggedIn()) {
        finish()
    }
}- Before proceeding, the activity checks whether a user is saved in the local
authdbSQLite DB. - If no user exists,
SecureActivityfinishes immediately — user is effectively “logged out”.
This allows offline persistence of authentication without relying on JWTs or tokens.
Network Monitoring with NetworkMonitor
networkMonitor = NetworkMonitor(this) { isOnline, justCameOnline ->
    if (justCameOnline) callApi()
}NetworkMonitoris a utility class that monitors connectivity changes.- The lambda
(isOnline, justCameOnline)is triggered on connectivity updates:- If the device just came back online,
callApi()is triggered. - Here, it’s a placeholder showing a
Toast, but in the real app this is where you’d:- Sync pending transactions.
- Refresh balance.
- Fetch latest updates from the backend.
- If the device just came back online,
- It is lifecycle-aware:
- Starts monitoring in
onResume() - Stops in
onPause()
- Starts monitoring in
Profile Page
Displays the authenticated user’s profile, including their:
- Name
- Contact info
- Unique user ID
- QR code for identification
- Logout functionality
User Info from Local DB
AuthDatabaseHelper(requireContext()).apply {
    binding.username.text = user.name
    binding.contact.text = user.phoneNumber
    binding.userid.text = user.id.toString()
}- Pulls the currently logged-in user from the local AuthDatabaseHelper.
- Efficiently sets it into the UI with:
usernamecontactuserid
QR Code Handling
var qrCode: Bitmap? = dbHelper?.getQRCode(binding.userid.text.toString())
if (qrCode == null) {
    qrCode = QRCodeUtils.generateQRCode(binding.userid.text.toString())
    dbHelper?.saveQRCode(binding.userid.text.toString(), qrCode)
}
qrCodeImageView?.setImageBitmap(qrCode)- Uses
DatabaseHelperto cache and retrieve the user’s QR code locally. - If missing, it generates a new one using
QRCodeUtilsand saves it. - Reduces repeated generation for efficiency - QR codes are static for a user.
Logout Functionality
binding.logoutButton.setOnClickListener {
    performLogout()
}- Calls
logoutUser()fromAuthDatabaseHelperto delete the session. - Navigates cleanly to
AuthActivity, ensuring:- Task stack is cleared.
- No back navigation to secure areas (
Intent.FLAG_ACTIVITY_CLEAR_TASK).
Flow:
ProfilePage (Fragment under SecureActivity)
│
├── Displays: user.name, user.phoneNumber, user.id
├── QR Code: cached or generated → shown in ImageView
├── Logout Button:
│    └─> Clears DB via AuthDatabaseHelper
│    └─> Redirects to AuthActivity (login/signup)
Scan and Pay Flow
The ScanPayFragment is responsible for scanning merchant QR codes using the device camera and decoding them in real time. This QR code typically contains the merchant’s client ID, which is used to initiate a money transfer.
This part will be highly technical, as it involves CameraX for real-time QR code scanning and ZXing for decoding. You can skip this part if you are not interested in the technical details, but I highly recommend going through it to understand how the app works.
Camera Initialization
When the fragment is created, it checks for the CAMERA permission:
if (allPermissionsGranted()) {
    startCamera()
} else {
    ActivityCompat.requestPermissions(...)
}
If permission is granted, startCamera() sets up the CameraX pipeline.
CameraX Setup
We configure two CameraX use cases:
- Preview: Renders the live camera feed in a
PreviewView. - ImageAnalysis: Processes frames to detect and decode QR codes.
val preview = Preview.Builder().build()
preview.setSurfaceProvider(previewView.surfaceProvider)
val imageAnalysis = ImageAnalysis.Builder()
.setBackpressureStrategy(ImageAnalysis.STRATEGY_KEEP_ONLY_LATEST)
.build()
.also {
it.setAnalyzer(executor, QRCodeAnalyzer { result -> ... })
}
These use cases are bound to the fragment lifecycle using:
cameraProvider.bindToLifecycle(
    viewLifecycleOwner,
    CameraSelector.DEFAULT_BACK_CAMERA,
    preview,
    imageAnalysis
)
QR Code Decoding
CameraX delivers frames in ImageProxy format (YUV_420_888). We extract the Y-plane (luminance) and convert it into PlanarYUVLuminanceSource, which ZXing requires for decoding.
val luminanceSource = imageProxy.toLuminanceSource()
val binaryBitmap = BinaryBitmap(HybridBinarizer(luminanceSource))
val result = MultiFormatReader().decode(binaryBitmap)
If decoding succeeds, we extract the text (client ID) from the QR code.
Post-Scan Navigation and Storage
Once the QR code is decoded:
- We persist the scanned
client_idusing Jetpack DataStore. - We navigate to the
SendMoneyfragment for the next step in the transaction.
lifecycleScope.launch {
    saveClientIdToDataStore(result.text)
    Navigation.findNavController(...).navigate(R.id.action_scanPayFragment_to_sendMoney)
}
Data Persistence
Data is stored locally using Jetpack DataStore with the stringPreferencesKey("client_id"):
requireContext().dataStore.edit { preferences ->
    preferences[clientIdKey] = clientId
}
This component is used during customer-to-merchant payments. The merchant displays a static QR containing their client ID. The customer scans it and is redirected to the payment screen with the merchant ID preloaded, ready for an offline SMS-based payment.
Send Money Flow
After the user scans a merchant QR code, they are redirected to the SendMoney fragment. This screen is responsible for composing and sending the payment information via SMS to the offline Celeris payment server. They can directly come here as well without scanning a QR code, by entering the merchant’s client ID manually.
Retrieving Scanned Merchant ID
When the fragment is initialized, it uses Jetpack DataStore to retrieve the previously scanned merchant client_id:
lifecycleScope.launch {
    val clientId = getClientIdFromDataStore()
    binding.merchantid.setText(clientId)
}
getClientIdFromDataStore() reads the value from local persistent storage:
val preferences = requireContext().dataStore.data.first()
return preferences[clientIdKey] ?: ""
This auto-fills the merchant ID field on the UI, reducing manual input and avoiding errors.
Loading User Information
The app uses the AuthDatabaseHelper to access the user data. When the fragment loads, the user’s current balance is shown on screen:
binding.balance.text = user.balance.toString()Composing the Payment SMS
When the user clicks the “Pay” button, the following steps occur:
-
The app constructs a raw message containing:
<sender_id>|<receiver_id>|<amount> -
This message is then sent as an SMS using Android’s
SmsManager:smsManager.sendTextMessage("<sms_gateway_phone_number>", null, msg, null, null)
Summary of the Flow
- The user scans a merchant QR →
client_idis saved. - In
SendMoney, this ID is fetched and pre-filled. - The user enters the amount and presses “Pay”.
- An SMS containing user ID, merchant ID, and amount is sent to the SMS gateway.
This flow supports offline payments in rural or low-connectivity environments by relying solely on SMS to transfer transactional data between devices and backend services.
Success Activity
The SuccessActivity is responsible for:
- Showing confirmation that a transaction has completed.
- Updating the user’s local balance based on the transaction direction (sent/received).
- Displaying the appropriate confirmation screen (
SentPageorReceivePage).
Receiving Transaction Metadata via Intent
This activity expects the following data to be passed in via Intent extras:
type: AStringwhich indicates whether the transaction was “sent” or “recieved”.amount: AnIntrepresenting the amount transferred.
val amount = intent.getIntExtra("amount", 0)
val type = intent.getStringExtra("type")
This information is attached by the BroadcastReceiver that listens for incoming SMS messages. It determines the transaction type based on the content of the SMS and passes it to this activity.
Displaying Confirmation UI
The layout activity_success contains a container where the result fragment is dynamically injected.
Based on the transaction type:
- If sent,
SentPagefragment is shown. - If recieved,
ReceivePagefragment is shown.
if (type == "sent") {
    supportFragmentManager.beginTransaction().replace(R.id.main, SentPage()).commit()
} else if (type == "recieved") {
    supportFragmentManager.beginTransaction().replace(R.id.main, ReceivePage()).commit()
}
Updating User Balance in Local Storage
After confirming the direction of the transaction, the user’s balance is updated accordingly using a local helper (AuthDatabaseHelper):
val db = AuthDatabaseHelper(this)
if (type == "sent") {
    db.setBalance(db.user.balance - amount)
} else if (type == "recieved") {
    db.setBalance(db.user.balance + amount)
}
This operation is completely offline.
Retrofit Client Utility
The RetrofitClient is a singleton object that provides a centralized HTTP client for all network operations in the Celeris app. It implements the singleton pattern using Kotlin’s object declaration and lazy initialization to ensure efficient resource usage and consistent API communication.
object RetrofitClient {
    private const val BASE_URL = "https://9997-2401-4900-6329-f-4f00-2453-c5e2-f72f.ngrok-free.app/"
    val instance: AuthApi by lazy {
        Retrofit.Builder()
            .baseUrl(BASE_URL)
            .addConverterFactory(GsonConverterFactory.create())
            .build()
            .create(AuthApi::class.java)
    }
}
The RetrofitClient serves as the gateway between the Android app and the Celeris backend server. When users perform authentication operations (login/signup), the app uses this client to send HTTP requests to the FastAPI endpoints. The responses are automatically converted to Kotlin objects, which are then processed by the authentication fragments.
AuthApi Utility
The AuthApi interface defines the contract for authentication-related HTTP operations using Retrofit’s annotation-based approach. It serves as a type-safe wrapper around the backend authentication endpoints.
interface AuthApi {
    @POST("/auth/signup")
    fun signup(@Body request: SignupRequest): Call<SignupResponse>

    @POST("/auth/login")
    fun login(@Body request: LoginRequest): Call<LoginResponse>
}
Endpoints
POST /auth/signup: Handles user registration by accepting aSignupRequestobject containing email, password, name, and phone number. The@Bodyannotation tells Retrofit to serialize the request object as JSON in the HTTP request body.POST /auth/login: Manages user authentication by accepting aLoginRequestwith email and password credentials. Both endpoints returnCall<T>objects, enabling asynchronous execution with built-in error handling.
Backend Integration
The AuthApi directly corresponds to the authentication endpoints in the Celeris FastAPI backend:
# Backend equivalent (FastAPI)
@app.post("/auth/signup")
async def signup(payload: SignupRequest):
    # User creation logic

@app.post("/auth/login")
async def login(payload: LoginRequest):
    # Authentication logic
This one-to-one mapping ensures consistency between client and server API contracts, reducing integration bugs and maintaining clear separation of concerns.
DataUtils: Persistent Key-Value Storage
The DataUtils file provides a Kotlin extension property that integrates Jetpack DataStore into the Android Context, enabling type-safe, asynchronous key-value storage throughout the app.
val Context.dataStore: DataStore<Preferences> by preferencesDataStore(name = "lmaodead")The DataStore is primarily used for storing temporary transaction data, particularly in the QR code scanning flow.
QRCodeUtils Utility
The QRCodeUtils class is a Java-based utility in the Celeris Android app responsible for generating QR codes, specifically used for merchant identification in customer-to-merchant (C2M) payment flows.
Purpose
This utility generates a static QR code that encodes the merchant’s unique client_id. It is typically displayed on the merchant’s device or printed, enabling customers to scan and initiate payments offline via SMS.
Implementation Breakdown
public class QRCodeUtils {
    public static Bitmap generateQRCode(String merchantId) {
        ...
    }
}
This utility exposes a single static method - generateQRCode(String merchantId) - which accepts a merchant ID string and returns a Bitmap object representing the generated QR code.
QR Code Generation Logic
The utility uses the ZXing (Zebra Crossing) library to generate QR codes. Here’s the full breakdown of the process:
-
Encode the merchant ID into a QR code matrix
QRCodeWriter writer = new QRCodeWriter(); BitMatrix bitMatrix = writer.encode(merchantId, BarcodeFormat.QR_CODE, 512, 512);QRCodeWriteris a ZXing class that generates QR codes.merchantIdis encoded into aBitMatrixusing theBarcodeFormat.QR_CODEformat.- The dimensions of the QR are hardcoded to
512x512pixels, ensuring high visual fidelity for scanning.
-
Render the BitMatrix to a Bitmap
Bitmap bmp = Bitmap.createBitmap(width, height, Bitmap.Config.RGB_565);- A
Bitmapis initialized to hold the visual QR code. RGB_565format is used for memory-efficient bitmap creation (uses 2 bytes per pixel).
- A
-
Paint the QR pixels manually
for (int x = 0; x < width; x++) { for (int y = 0; y < height; y++) { bmp.setPixel(x, y, bitMatrix.get(x, y) ? Color.BLACK : Color.WHITE); } }- The nested loops iterate over every pixel in the matrix.
- The pixel is painted black if the bit at that location is
true, else it’s painted white. - This ensures precise control over QR code rendering, which is crucial for scanner compatibility.
-
Error Handling
catch (WriterException e) {
     e.printStackTrace();
 }
If the QR code encoding fails (due to unsupported input or internal ZXing errors), the method logs the stack trace and returns
null.
Usage Context in Celeris
The QRCodeUtils.generateQRCode() function is used when merchants log in and land on their home screen. The app auto-generates a QR code with their client_id embedded:
val qrBitmap = QRCodeUtils.generateQRCode(merchantId)
qrImageView.setImageBitmap(qrBitmap)
This bitmap is then rendered into an ImageView, turning the app into a static offline payment receiver as well. In areas with low or no internet connectivity, having a static QR code that’s easily scannable by feature-rich offline Android devices is vital. This QR-based approach forms the backbone of Celeris’ offline-first vision, enabling seamless payments without a traditional internet layer.
NetworkMonitor Utility
The NetworkMonitor class is a lightweight, lifecycle-aware network state observer in the Celeris Android application. It actively listens for changes in network connectivity and notifies the app about:
- Whether the device is online or offline.
- Whether the device just came online after being offline.
This enables Celeris to reactively adjust UI/UX or trigger sync logic when connectivity status changes which is crucial in an app built to thrive in both connected and offline environments.
Constructor Parameters
class NetworkMonitor(
    context: Context,
    private val onNetworkChange: (isOnline: Boolean, justCameOnline: Boolean) -> Unit
)context: Needed to obtain the systemConnectivityManager.onNetworkChange: A callback lambda that is triggered whenever the device’s connectivity state changes.
Internals
-
ConnectivityManager Reference
private val connectivityManager =
    context.getSystemService(Context.CONNECTIVITY_SERVICE) as ConnectivityManager
Fetches the system-level connectivity service for managing network state.
-
Online State Memory
private var wasOnline = falseStores the last known state of connectivity to detect state transitions (e.g., offline → online).
-
NetworkCallback
private val networkCallback = object : ConnectivityManager.NetworkCallback() {
    ...
}
Implements two key override methods:
-
onAvailable:
Triggered when a new network becomes available.
override fun onAvailable(network: Network) { val isOnline = isCurrentlyOnline() if (!wasOnline && isOnline) { onNetworkChange(true, true) // Just came online } else { onNetworkChange(true, false) } wasOnline = true }- Double-checks if the network is truly online using
isCurrentlyOnline(). - Differentiates between continuous online state and transition from offline.
- Double-checks if the network is truly online using
-
onLost:
Triggered when the network connection is lost.
override fun onLost(network: Network) { onNetworkChange(false, false) wasOnline = false }- Immediately fires the callback with
isOnline = false.
- Immediately fires the callback with
-
Start & Stop Listening
fun start() {
    val request = NetworkRequest.Builder()
        .addCapability(NetworkCapabilities.NET_CAPABILITY_INTERNET)
        .build()
    connectivityManager.registerNetworkCallback(request, networkCallback)
    wasOnline = isCurrentlyOnline()
}- Registers the network callback using a
NetworkRequestthat filters for internet-capable connections. - Sets the initial state of
wasOnline.
fun stop() {
    try {
        connectivityManager.unregisterNetworkCallback(networkCallback)
    } catch (_: Exception) {}
}- Unregisters the callback.
- Fails silently in case the callback wasn’t registered (e.g., app exit or lifecycle mismatch).
Checking Network Status
fun isCurrentlyOnline(): Boolean {
    val network = connectivityManager.activeNetwork ?: return false
    val capabilities = connectivityManager.getNetworkCapabilities(network) ?: return false
    return capabilities.hasCapability(NetworkCapabilities.NET_CAPABILITY_INTERNET) &&
            capabilities.hasCapability(NetworkCapabilities.NET_CAPABILITY_VALIDATED)
}
This function performs a deep connectivity check:
- Confirms the device has an active network.
- Ensures it has internet access (
NET_CAPABILITY_INTERNET) and is validated by Android’s network validation system (NET_CAPABILITY_VALIDATED). - This guards against false positives (e.g., captive portals or no internet access despite Wi-Fi connection).
Use Case in Celeris
The NetworkMonitor class is used in contexts where:
- Offline-first UI behavior is essential.
- We need to sync data when the device comes back online.
- The app needs to adjust its behavior based on connectivity (e.g., showing offline banners, disabling online features).
SMSReceiver
The SMSReceiver class is a BroadcastReceiver responsible for intercepting incoming SMS messages from the Celeris payment server. It processes these messages to determine the result of a transaction (success or failure) and immediately redirects the user to the appropriate result screen (SuccessActivity or ErrorActivity).
This receiver is essential to the offline-first architecture of Celeris, allowing the system to process and reflect transaction results without requiring an internet connection.
Overview of Responsibilities
- Listens for incoming SMS broadcasts.
- Filters messages from the known Celeris server number.
- Parses transaction metadata from the message body.
- Redirects the user to either a success or error screen based on transaction outcome.
Listening for Incoming SMS
@Override
public void onReceive(Context context, Intent intent) {
    if (Objects.equals(intent.getAction(), "android.provider.Telephony.SMS_RECEIVED")) {
        ...
    }
}
The receiver listens explicitly for the SMS_RECEIVED broadcast action using an intent filter in AndroidManifest.xml.
Parsing the SMS Payload
Object[] pdus = (Object[]) bundle.get("pdus");
String format = bundle.getString("format");
SmsMessage.createFromPdu((byte[]) pdu, format);- Extracts the raw SMS data units (
pdus) from the incoming broadcast. - Uses the
SmsMessage.createFromPdu()API to decode each SMS message from its raw bytes. - Supports multi-part SMS handling (if a message spans multiple segments).
Filtering Messages from the Celeris Gateway
if (sender != null && sender.equals(TARGET_PHONE_NUMBER)) {
    ...
}- Only processes messages sent from the designated Celeris SMS gateway number.
- Ensures third-party or irrelevant SMS messages are ignored.
Processing the Message Content
private void processSMS(Context context, String sender, String message) {
    String[] messages = message.split("\\|");
    int amount = Integer.parseInt(messages[0]);
    String status = messages[1];
    String type = messages[2];
}
The SMS is expected to follow a strict format:
<amount>|<status>|<type>amount: The amount of money sent or received.status:"successful","unsuccessful", or"failed".type:"sent"or"received"- indicates transaction direction.
Redirecting to Transaction Outcome Screen
Depending on the parsed status, the receiver launches the appropriate activity:
Failure Case:
if (Objects.equals(status, "unsuccessful") || Objects.equals(status, "failed")) {
    Intent intent = new Intent(context, ErrorActivity.class);
    ...
    context.startActivity(intent);
}
Success Case:
else if (Objects.equals(status, "successful")) {
    Intent intent = new Intent(context, SuccessActivity.class);
    ...
    context.startActivity(intent);
}
Both activities receive the following via Intent extras:
amount: To display the transaction value.type: To determine which UI to show (send or receive page).
intent.putExtra("amount", amount);
intent.putExtra("type", type);
intent.setFlags(Intent.FLAG_ACTIVITY_NEW_TASK);
The FLAG_ACTIVITY_NEW_TASK flag ensures the activity launches properly from a non-activity context.
Offline First Impact
This class is a cornerstone of offline transactional integrity in the Celeris ecosystem. Even if users have zero internet access, they are:
- Notified of transaction status instantly via SMS.
- Able to see real-time confirmation/error screens.
- Kept in sync with their offline wallet balance (via
SuccessActivityupdates).
Un-technical Stuff: Team Coordination and Project Management
The Celeris project was developed by a team of 4 members, each contributing to different aspects of the application. The project management and coordination were primarily handled through GitHub, where we utilized GitHub projects to track the progress of development. The first step was to actually divide the work based on team member knowledge, this is the hardest of it all and requires a lot of communication and understanding of each other’s strengths and weaknesses.
I decided to push everyone to work on the parts they were most comfortable with, while also encouraging them to learn new things. This approach not only helped us complete the project efficiently but also allowed each member to grow their skills.
We had informal standups during the whole hackathon where we discussed what is everyone working on, what challenges they are facing, and how we can help each other. This open communication helped us stay aligned and motivated throughout the hackathon. This way, we were able to quickly address any issues that arose and keep the project moving forward.
Since the project was divided to the most atomic parts it can, it was easy to track the progress of each member and integrate the changes without conflicts. There was no overlapping work, and each member had a clear understanding of their responsibilities. This also made it easier to review each other’s code and provide feedback, which is crucial for maintaining code quality. Although there were some merge conflicts, they were resolved quickly due to the clear division of work and regular communication.
I learnt a lot about team coordination and project management during this hackathon. It was a great experience to work with a team of talented individuals, and I am proud of what we accomplished together. The project not only helped us improve our technical skills but also taught us the importance of effective communication and collaboration in software development. This experience will definitely help me in future projects, and I look forward to applying these lessons in my next endeavors.
Clarity should always be above everything, and I am glad that we were able to maintain that throughout the project. The clear division of work, regular communication, and open feedback helped us stay on track and deliver a high-quality product within the limited time frame of the hackathon.
For the first time in a hackathon, I actually saw the project finish on time, and I am really proud of that. The project was not only completed but also met the requirements and expectations set at the beginning. This is a testament to the hard work and dedication of each team member, and I am grateful for their contributions.
Celeris is a great project and there are a lot of areas of improvement, ranging from security to performance. I am looking forward to continuing the development of this project and making it even better. The foundation we have built during this hackathon will serve as a solid base for future enhancements and features. We can use this project in future hackathons or as a starting point for a more comprehensive offline-first payment solution.
Conclusion
Celeris is a pioneering Android application that embodies the principles of offline-first design, enabling users to perform financial transactions without relying on constant internet connectivity. By leveraging local data persistence, real-time QR code scanning, and SMS-based payment processing, Celeris provides a seamless user experience even in low-connectivity environments.
To everyone else, never go towards perfection. Build the MVP first, and then iterate on it. This hackathon taught me that perfection is the enemy of progress, and it’s better to have a working product that can be improved over time than to strive for an unattainable ideal.
And a very important point to anyone who is reading this: Always have a plan, and a clear vision of what you want to achieve. This will help you stay focused and motivated, even when things get tough. The Celeris project was a great example of how a clear vision and effective planning can lead to successful outcomes.
Thank you for reading this blog post about Celeris, and I hope it inspires you to build your own applications. I really hope you must have learned something new from this post, and I would love to hear your thoughts and feedback. If you have any questions or suggestions, feel free to reach out to me on Twitter or GitHub.